Sunday, August 5, 2012

Happy Sunday! As promised I am bringing you another tutorial! This time it's all about Bears! I have a Bear Themed Baby Shower coming up and this cute little bear is part of the decorations on the cake. What cute bear? Well, follow along and you will see how he's made....or just skip to the bottom of this page to get a peek! LOL!

 First off never ever get rid of extra fondant. A few weeks ago I had to use a sort of light brown fondant for a cake that was then painted...the Steampunk cake. Well, the leftovers were carefully stored back in a ziplock bag for "figurine" use. I always save leftover fondant for upcoming projects if I know it is not going to be used for an edible decoration. Making figures such as this bear or a monogram letter or flowers that will be removed before cutting are all good uses for leftover fondant. In this case I started out with a light brown fondant and then added a bit more brown to make the lighter of these two balls and then added even more brown and some black to make the really dark brown. You can make your bear any color you want, of course, but this one needs to match the party decorations so he's a dark brown now.
 I set the lighter of the two balls back into a bit of plastic wrap so it wouldn't dry out and then divided the larger ball into it's pieces. One for the body, one for the head (and ears), two for legs and two slightly smaller ones for arms. 
 Then I rolled out the body. I wasn't too worried about the "seam" lines that happen when you roll fondant because I knew I was texturing the bear later. I made the body sort of oval and then, using my thumbs, marked where I wanted the legs and arms.
 Then for the head. I rolled out a big ball and flattened it out. Nice and round...like a teddy bear head.
 I rolled the legs into small logs that had one end fatter than the other. Then I tapped that end down on my mat to make it flatter. Using this tool I used one end to make the foot mark and the other end to make the toes markings.
 I did exactly the same thing to the arms. They are thinner and shorter than the legs but have the same markings.
 I brought out the little light brown fondant ball at this point to make the pads. I needed one for the face, one for the belly, two for the feet and two for the arms. 
 The one for the face I rolled into a ball and then flattened it out to sort of a triangle. Then using the same tool I used on the feet I added a nose line and a mouth and eyes. The nose is actually a little round candy that was stuck on with a little tylose glue. This is made from a little bit of warm water and powdered tylose.
 Next I added on the pads by rolling them up, flattening them out to about the thickness of a nickle and then using a piping tip, cut out the circles. Then I spread them out gently to fit the pads of the arms and feet. Finally I rolled out the belly pad and used an oval cutter to cut it out before placing it on and adding a belly button.
 Now for the ears. For those you make little balls and when you flatten them out you sort of push down, leaving one edge thinner than the other. Then I used a small ball tool to make the center indention.
 I used toothpics at each join. For the arms, the legs, the head and the ears. I insert the toothpic into the body, add tylose glue and then stick on the part. But for the ears I do it just a bit differently. For the ears I stick in the ends of a toothpick, sort of like pre-drilling the hole.
 Then I insert the pointy end of the toothpick into the ear and sort of wrap that thinner edge around the pic. This is not the time for perfectly round ears. His ears are part of his "personality" so make them a bit uneven and different from eachother. Then I put glue where I want the ears to sit, in the pre-drilled holes, and place the ears there.
The last thing I did was use a scalloping tool to lightly "scratch" in fur for our bear. For the face I only used it to make a tuft of hair over the eyes and on the cheeks but then scratched away on the back of the head and all over the body. Then I added a bit of black food dye to the eyes with a broken toothpic. Just to give them a bit more depth and color.


 The final touch was to give him some pad marks on his hands and feel by using that same small ball tool that I used on the ears and gently pressing down into the pad.


Now here is the funny part. Whenever I make a figurine I feel like they grow a personality and a name at the same time. These figures are never "it" but always, from the beginning, a "he" or "she". This bear is so very clearly a "he" to me. So everyone, I'd like you to meet Rudy. Rudy the Bear, welcome to the world!


See y'all next week! There is a Bridal Shower cake on tap that I can't wait to share with you all!

Cat

Sunday, July 29, 2012

Happy Sunday! As promised today, I will be working on a sugar rose. 

I have an upcoming cake that is a "background cake" for Beauty and the Beast. I have the figurines already purchased and ready to go on the cake, now I just need the cake! 

The cake topper for this cake will be "The Rose". Because it will be "suspended" under a dome I need the rose to be rock hard before I assemble the topper piece...thus, even though the cake is not due till the 18th, I need to start work on the rose now. And here is the reason...

I love using Duff's Fondant, bought at Michaels with their 40% off coupon of course, but it is a very "soft" fondant. You have to make adjustments in your timeline in order to get it to dry out enough.
 The first thing you have to do is add tylose or gumpaste. I prefer tylose and use about a teaspoon for a small amount like this. I know, I know, it seems like a lot of tylose for such a small amount of fondant but this is VERY soft fondant...it needs the tylose or you will be waiting days for the petals to dry up enough just to be able to use them!
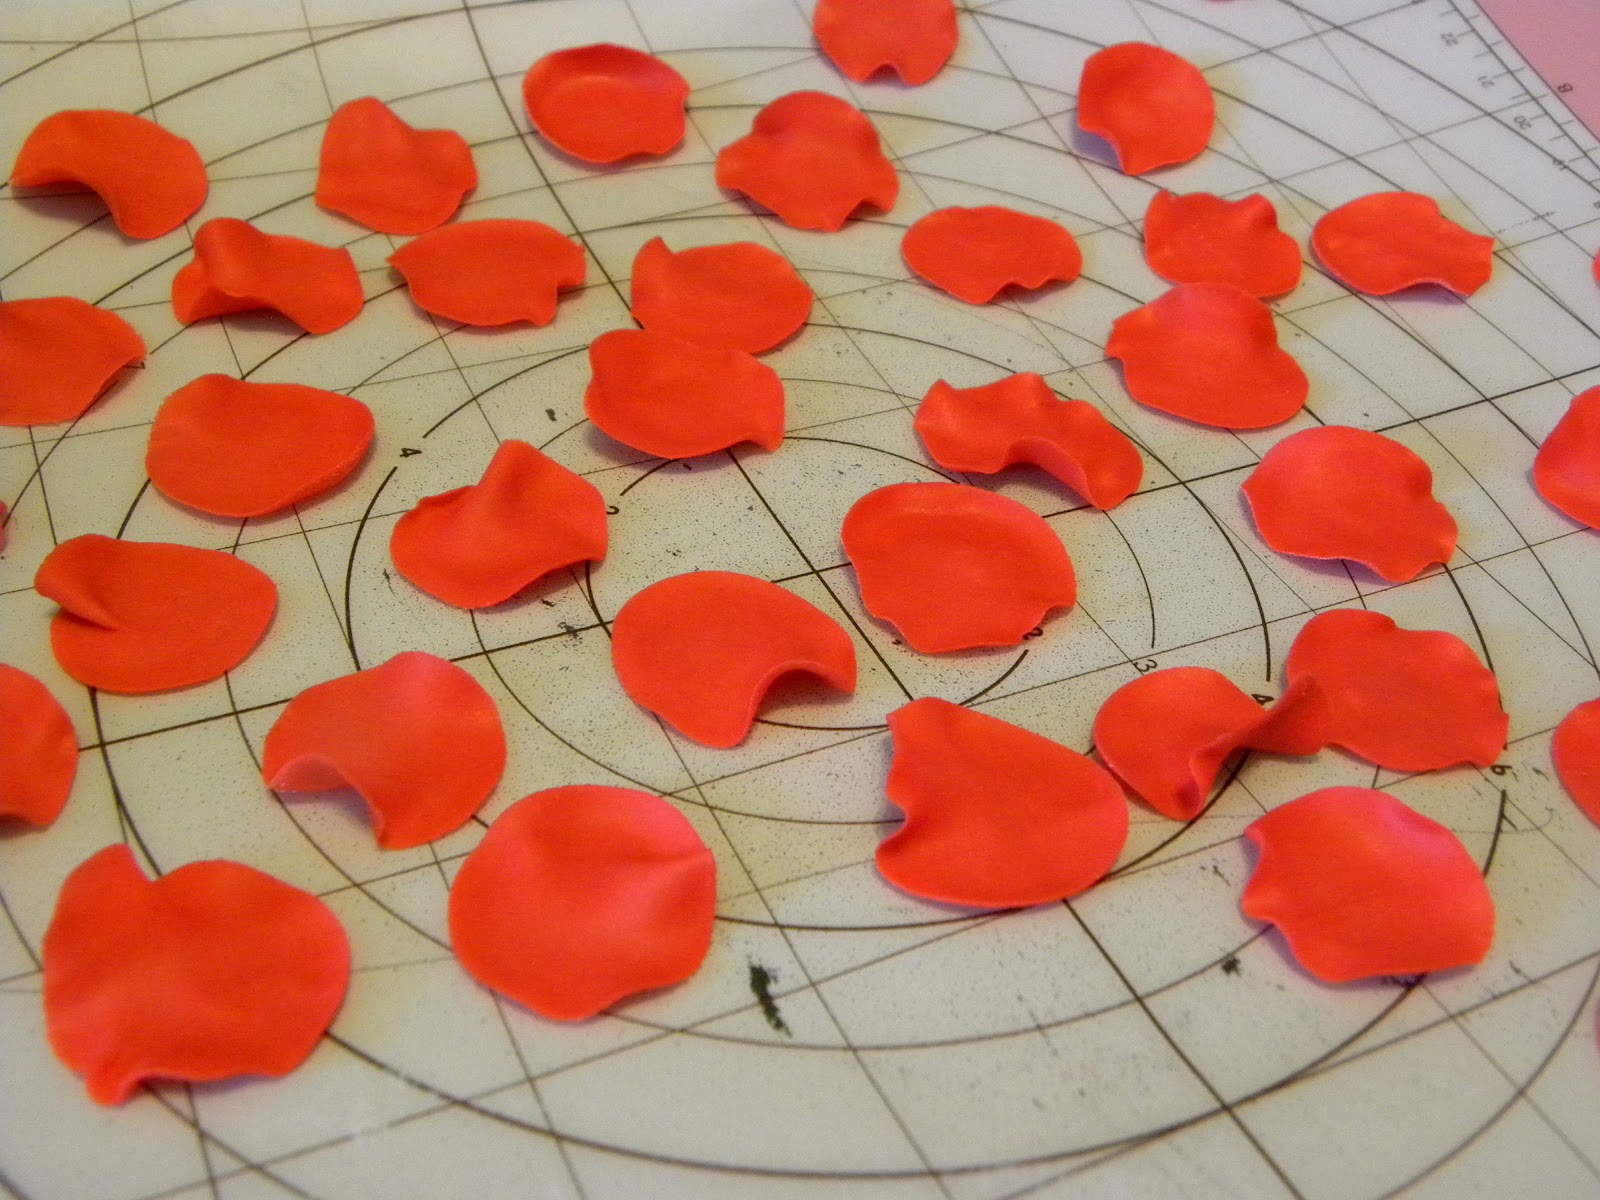
 After kneading the tylose in very well I then roll out the fondant to about the thinness of a dime. The top of this cake is only 6 inches so I have to make sure the rose isn't too big for it. Normally I use round cutters but a piping tip worked perfectly for this size of petal.
 Once I cut them all out and removed the excess fondant I used this "ball tool" above to start ruffling the edges. 
 I use a thin foam mat and begin, in a circular motion, from the middle of the circle to the outside edges lightly pushing out and down. As the fondant gets thinner it will begin to ruffle.
 For this rose I cut out about 30 rounds. This is for two reasons. One is that this is a very compact rose style and you never know when you will go to use a petal and it will tear or bend wrong or break so you should always have back up petals just in case. I ended up using about 25 out of the 30.
 Next I made up my "glue". This is just tylose sprinkled over water and then mixed well and allowed a bit of time to "gell" up. When you first stir it into the water it will look "clumpy" like it didn't actually mix in well. Give it a few moments then stir it again. You will see it start to get clear and gell like in texture. Add more tylose or more water to get the consistency of white glue.
 Next I cut floral wire the length I think I need for my rose height. Then I rolled out a small center oval for my rose bud. I dipped the wire into the "glue" and then inserted this into the oval ball. I then let it set up for a small while. Do not rush this process or your rose will fall apart. Especially if you are working with soft fondant to begin with!
 I then began the process of adding the first petals around the oval ball to create my rose bud. I just used a paint brush to brush on a bit of glue onto the petal and then put that around the oval ball.
 This is the center of your rose. You will build up all the rest of your rose based on this center. 
 I added another petal and then let it set up for about an hour. If you rush this process then the weight of the petals and glue will drag your petals down and off your wire and just make a mess.
 Then I gradually started to build up my rose till I had a smallish size group of petals. Once again I stopped and let it dry up for about an hour.
 This is the last step before adding the final larger petals to the outside. I have about 25 petals onto the rose now and this is where I will let it set up overnight and dry.
 Normally I would have hung my rose upside down on a wire rack but I need the wire on this rose to stay straight and not have a loop on the bottom of it. So I used a small box that I put a hole into the top for the stem to poke through and then used a shallow flower cup to hold the rose while it dried overnight.
 The next morning I added the final big petals to the rose. I cut out 5 more circles of thicker fondant and then, using the ball tool, ruffled them out till they were the same thickness as the smaller petals. This makes for a uniform bottom of your rose.
 You can now see the final rose with the larger petals framing the smaller ones. For whatever reason my camera photographed this more orange than red but it is truly red.
 I then rolled out the green fondant and cut out the calyx, or bottom leaves, for the rose. I used a bit of glue in the middle and on part of the leaves and then stuck the wire right through the center. Then I started pressing the calyx to the rose.
 I also used a leaf cutter to cut out the leaf shapes. Then used the ball tool to thin them out and give more realistic edges to each one but leaving the base of the leaf thicker than the tip. I used a veining tool to make the lines. Finally I used really fine wire that I inserted into the thicker end and then let them dry.
 The first thing I did before moving on was to go look at a photo of the Beauty and the Beast rose so I could know how it is supposed to bend and where to put the leaves. It kinks in two places so I slightly bent the wire before starting with the floral tape. I began the floral tape on the top of the wire, where the wire meets the rose, and then wrapped it to the bottom and then back to the top again leaving a tail.
 Then I wired the leaves onto the stem and continued taping the stem all the way to the bottom again helping to secure the wired leaves. 
 Here it is fully wired and wrapped.
Storing this rose, while it dries, was an interesting problem. I finally ended up getting chopsticks that are not broken apart but separated just enough to hold up the rose where it meets the taped wire and then suspended those off a bucket tall enough so the stem doesn't touch the surface and then weighted the chopsticks down to make sure they stay secure. They will sit like this until it is time to assemble the cake top.  When that times comes, more wire will be inserted into the stem from the bottom and then down into a stir stick which will be into the cake. This will hold the rose a small way up from the surface of the cake to give the illusion of it being suspended under the dome on top of the cake.


Hope this tutorial helped you to understand how to make a sugar flower...or at least what goes into the process of making one. If you have ANY questions just leave them in the comments section and I'll do my very best to help!


See you next week with a sugar bear tutorial!

Cat

Sunday, July 22, 2012

Happy Sunday! This week is all about Baby Showers! The trend for showers in the past 5 years has been "bigger is better". Due to the economy lots of families are using showers and weddings as a replacement for family reunions. So the entire family gets invited, has a great "event" together, usually in an event space with catering, big cake, etc. But not all Mom's-to-be are wanting or needing a huge shower. It may just be a few friends around a coffee table in their mom's house. We don't believe that this means you should have to give up the adorable cake! Just scale it down a bit.


This "Cute as a Button" cake would be the perfect version if you only have 10 people to feed but still want an adorable cake to serve. It is a 6 inch cake which feeds 15 so you would have a few leftovers for later! Lemon chiffon with fresh strawberry preserves filling, covered in vanilla buttercream first and then fresh vanilla marshmallow frosting. So good that everyone will be going "MMMmmmmm" after you serve it!


The "secret" to this cake is the buttons. They are SO easy you are going to wonder why you haven't used this idea before! Just use a small round cutter in the size you want the buttons to be to cut out the colored fondant. Then use a slightly smaller cutter to gently press the inside circle down into the larger circle. Finally use either a fondant tool, which is what I did, or a skewer or a toothpick to make the holes in the buttons. Easy to use royal icing to crisscross them like they are "sewed" to the cake if you want to add that detail. We didn't do that here so you could see the holes clearly. SO easy! Just let them dry for a bit...I think we let them dry for about an hour...then place them on the cake with a bit of water for "glue". 


Today's cake was a "teaching cake". I was teaching how to make fresh fondant and how to use it on a real cake. This did double duty for me as it allowed my student to learn a few new fondant techniques but also allowed my client, the next day, to sample one of my cakes at her tasting. Normally I teach on a styrofoam "dummy" cake which gives the student a more sturdy surface to learn upon but since I need the cake for a tasting I figured this was also a good way for the student to learn how to work with real cake as their base.


Normally, for small cakes such as shower cakes, I don't need to do a tasting. Chances are they are clients who have either attended an event and tasted my cake or have heard from clients how good the cake is and thus don't require a tasting. Wedding cake clients always get a tasting! However, this is a new client and she was dubious about the taste of fondant. All she had tasted, up to this point, is the type of fondant that some bakeries get from a tub. Now the problem with that is the tub could have been sitting on a shelf for months before it was purchased by the bakery and then sitting on the bakery shelves for awhile before it was used on your cake. Think about the taste of freshly baked bread compared to bread that you get at the store, sliced and in bags. The sliced bread tastes ok but the fresh baked bread is amazing! Always ask the bakery or the caker, that you use when their fondant was made. If it has been made in the past two weeks then it will still have that fresh taste to it. Any older and you start to lose that wonderful taste and texture of fresh fondant. I make my fondant the same week as the cake is made. So freshly baked cake with freshly made fondant. It makes all the difference in the world!


The other thing I do is use the best ingredients I can. Unless your health requires you to go gluten or sugar or dairy free, then this is not the time for substitutions. Let your weight loss wait a day and go for the treat. However if you DO have an allergic reaction to gluten, sugar or dairy, make sure to tell your baker. We do have ways to make your cake the way you need it and still taste good. As good as our full fat, dairy and gluten included cakes? Well, no, but still very very good. And everyone should be able to have cake!


See you next week! I am working on "piece work" the next two weeks. I have a few cakes that need figures or flowers so as I work on them I'll be taking photos so that you guys can have tutorials! I'll post the first one of these next Sunday!

Cat

Sunday, July 15, 2012

Happy Sunday! I'm on vacation this week so I thought, with no cake to share, I would share another part of Caking...the filling! You can let your imagination fly when it comes to what to put between your cake layers. In fact, you can mix it up from tier to tier even, using the same cake flavor and different fillings!

The cake pictured above is actually a "cake favor". These were packaged up and given as favors for those attending a baby shower. The Mom to Be chose yellow cake with lemon glaze for each guest. I have a 3 inch pan so it was easy enough to bake the mini cakes quickly and then boxed them up in favor boxes tied with ribbon. So you don't even "need" a filling if you don't want to use one!

Glazes are really easy to do. Primarily powdered sugar and milk or juice, a glaze goes together quickly and inexpensively and is almost impossible to mess up. Here is my favorite recipe for this lemon glaze that has real lemon zest in it. 

LEMON ZEST GLAZE
1 cup powdered sugar
2 tablespoon lemon juice 
2 tablespoons lemon zest

Just mix the ingredients all together with a fork and pour over the freshly baked cake! It makes about a cup and a half so just double or triple the recipe as needed. This will make more than enough for an 8 inch round 2 inch high cake.
Something I do every year is make jam. I just finished this batch of strawberry jam and will be making apricot jam next week. I try to keep fresh jam around for the entire year and have been known to make up new jars when I get an order for a cake with this filling. The one thing you have to be aware of is that jam is very sweet so you have to pair it with a cake that isn't so sweet. I love using my apricot jam to fill a dark chocolate cake. The more bitter dark chocolate along with the sweet apricot is a joy that has to be tasted to be believed...and once you do, you will be hooked! Here is my favorite jam recipe!

Fresh Strawberry Jam

Copyright 2004, Ina Garten, All Rights Reserved
Prep Time:
10 min
Inactive Prep Time:
--
Cook Time:
20 min
Level:
Intermediate
Serves:
2 pints

Ingredients

  • 2 cups sugar
  • 1 large lemon, zested and juiced
  • 1 1/2 pints fresh strawberries, hulled and halved

Directions

Combine the sugar, lemon zest, and lemon juice in a small saucepan and cook over very low heat for 10 minutes, until the sugar is dissolved. Add the strawberries and continue to cook over very low heat for 20 minutes, until the strawberries release some of their juices and the mixture boils slowly. Cook until a small amount of the juice gels on a very cold plate. (I keep one in the freezer.) This is at about 220 degrees on a candy thermometer. Pour carefully into 2 pint canning jars and either seal or keep refrigerated.

A note about making jam. I choose to not use pectin (a preservative) in my jams. I like the fact that my fillings are all natural. To do this, however, you must can them properly. There are a lot of canning sites online that will walk you through this process but here is an extra tip. Often you will be told to just put the jam into the jars and refrigerate it...that you don't need to "process" it. I always process mine. This means that after you put the jam into your jars you then put them into a "water bath" (heavy duty pan filled almost to the top with hot water...submerge the jars all the way or to the lips after putting the lids on) and let them boil for about 15 minutes until the cap "pops". This is when you know your jam is sealed from air and bacteria.  If, for some reason, the lid doesn't pop you will want to use that jam immediately. Otherwise you can leave the unopened jars in your refrigerator for up to six months.  Once you pop the seal make sure you use the jam within 3 weeks.
Lemon curd is another wonderful filling to use when incorporated into your buttercream for the filling. This is not a recipe I have been able to master so far, but I keep trying. Instead I usually purchase a particular jarred English lemon curd from my local tea shop for this filling. So don't feel badly if you don't make your own fillings fresh. I prefer to use fillings from scratch because I want to keep additives and preservatives out of my cakes but it is not always possible. Just be choosy when you do select which jams to use. Try not to use sugar free (which often has some sort of chemical sweetener in it), use seedless and read the labels to keep the artificial additives down to a minimum.
Last word on fillings. When you are getting ready to use a filling like a jam or preserves, and I'll explain the difference in a moment, you will want to make sure that you make a ring of stiff icing to act as a dam between your filling and the outside of your cake. Just mix a bit of extra powdered sugar into your buttercream and then put that into a piping bag without a tip. Go around the outside of your layer and make a complete solid ring. Then put the filling inside the ring.
So, in case you were wondering, preserves are big chunks of the fruit with very little "sauce" used. Jam is where the fruit has been crushed during the process and more "sauce" is included with the fruit into the jars. Jelly is all sauce with the fruit pieces strained from the sauce before it is placed into the jars. This turns out looking see through in the end. 

I hope you will be inspired to make your own fillings but, if not, then maybe just think outside of the box when choosing fillings for your next cake project!

Cat

Sunday, July 8, 2012

Happy Sunday! Hope all of you here in the USA enjoyed a wonderful 4th of July! This week brought a birthday for a client who was born on the 4th of July. Like being born on Christmas you can either choose to remove your birthday from the holiday or completely embrace it. She completely embraces it! 

She's also a Betty Boop fan. When we were discussing the design of the cake she already knew it had to be red, white and blue. When she said she loved Betty Boop I just knew I had to go find the Patriotic Betty that I had seen awhile ago. I found her and let my client know that if she wanted to use that I could work that into the design. She loved Patriotic Betty and the idea that she could keep a part of her cake after the party.

I've mentioned this before but in case you are just "tuning in" for the blog I'll quickly cover it again. Each character created is copyrighted. I would need to pay licensing rights if I copied the character in fondant or drawings in order to use the copyrighted "image" and sell the cake. Now if I am just making a cake for a family birthday, like my granddaughters Mickey hat birthday cake, then I can make the character...I'm not selling it. But when it comes to a clients cake I have to make what is known as a "background" cake. So that is exactly what this one is.

The cake is a lemon chiffon with raspberry filling. The bottom is an 8 inch, the top a 4 inch. It feeds 32 people. The blue and white fondant covering it is my homemade fresh marshmallow fondant. I never make the fondant more than a few days ahead of time because I want it to taste as yummy as possible. A lot of the fondant you may have tasted in the past is a packaged fondant that is sold in huge tubs and could have been sitting on the shelf for months. As fondant goes stale it ends up being a sort of papery tasting gum. It's stale and chewy. Not good. Fresh fondant tastes like vanilla and sugar. It's delicious. 

Because I'm not a fan of packaged fondant I am extremely picky when I have to use it. Black and red fondant is very hard to make. It takes a ton of food dye which ends up making the fondant taste like chemicals. Not what you want going onto a cake. I have tried several brands and the one I fell in love with is Duff Goldman's. It doesn't taste stale or like chemicals. In fact, the black tastes like really good tootsie rolls! Whenever I need red or black I go to Michael's and use their 40% off coupon, it's $20 for about 3 cups of fondant so the 40% off is important!

A cake like this is labor intensive. All the stars have to be cut out and the lines all made and then comes the rolling of the fondant "marbles" for the trim. It isn't hard, it just takes a lot of time. Unfortunately none of this can be done ahead of time because it needs to be soft and yummy for eating. If fondant is set out too soon it begins to harden up. This is great for fondant items that you want to stand up or stick out but not for fondant you want to cut with the cake slices. 

As you can see, the cake is offset to allow room for Betty to take center stage. This is stacked just like a regular stacked cake with dowels under the cake board. It is also staked with a dowel right down the center to keep it stable for transport. What is different is the "fireworks". Those are metal so they can not come in contact with the cake. In order to use them you have to insert food grade holders down into the frosting and then insert the metal decorations down into those tubes. I use coffee stirrers but you can use cocktail straws or regular straws if need be. Fortunately these are completely inexpensive and come in huge quantities so I always have them on hand whether I need to use 2 or 20. 

The client was very happy with her cake. She loved Betty playing center stage as well. I have to say that, while the cake would have been a great patriotic cake all by itself, Betty made the cake! 

See you all next Sunday!

Cat

Sunday, July 1, 2012

Happy Sunday! This week brought a different sort of treat! We had a family picnic yesterday and each family was required to bring one type of homemade cookie. This made a cookie bar for the whole family of all sorts of cookies from chocolate chip to lemon bars to my own "Chocolate Crack". Leftovers were divided up and sent home with each family so we could enjoy the different types of cookies when we got home again!

Chocolate Crack started out named Chocolate Crackers because it was made with a base of Saltine Crackers and then got shortened from there to "Crack". Like the drug, it's hard to stop eating these, they are SO good they are almost addicting. It's a toffee bar covered in chocolate on top of graham crackers....YUM! The wonderful thing about them is that they are not expensive and are very very easy to make! Once a year I share this recipe so I'm passing it on again here...

Chocolate Crack

Ingredients


  • 1 foil lined and PAM sprayed cookie sheet
    1 box graham crackers
    1 cup packed brown sugar
    1 cup (2 sticks) real butter (if you use unsalted like I do then add ½ tsp salt)
    1 bag choco chips

INSTRUCTIONS

Place crackers on a large cookie sheet, completely covering the bottom in a single layer. You can break up the crackers to fit. Pre-heat oven to 350. Put brown sugar and butter (and salt if needed) into a small sauce pan and bring to a boil. Stir frequently with wooden spoon while butter is melting. Once it starts to boil stir constantly for 5 minutes. Immediately pour over graham crackers. Smooth out as evenly as possible to cover all of the crackers. Bake for 10 mins. Remove from oven and sprinkle the whole bag of choco chips over the hot crackers. Wait about 30 seconds for chips to melt then spread like icing over entire pan of crackers. Place immediately into fridge or freezer and let them cool till rock hard. Once completely cooled break the crackers up into roughly 2×2 pieces. 

As mentioned above, you can use Saltines instead of Graham Crackers. You can also use margarine instead of butter but butter makes it more rich. I used a combo of milk and white chocolate chips but you can use whatever chips make you happy. Make sure you make these when you have a group of people to feed or you will end up eating the whole pan by yourself. 

Next week, of course, is the 4th of July, America's Independence Day. I'm working on a very Patriotic Birthday Cake for a client so you will get to see it next Sunday in the blog. Have a great week and, if you are in the USA, have fun celebrating!

Cat


Monday, June 25, 2012

Happy Monday! The blogs are delayed by one day this week due to the fact I was working out of town this past weekend and didn't get in until almost 11pm last night...I figured no one would be reading a Cake Blog at midnight so I sent myself to bed instead! LOL!

First let me say again...Congrats Mr. & Mrs. Albert! We are so happy for you and so pleased you included us in your wedding day! The photo above is their wedding cake...the studio version. I always photograph my cakes before they are delivered just in case I get hit by a semi and the cake is destroyed...just covering my bases...LOL...so this was the first photo I took of it. It definitely wasn't the last. 

This cake feeds 96. The bottom tier is a 10x10x4. It feeds 50 all by itself! Then the next tier is a hex 8x4 and it feeds 30. Then the top tier is a 6x4 which feeds 16. The standard "party" cake is only 2 inches tall so you would cut 2x2 inch slices of a party cake. Not so with a wedding cake. They are 4 inches tall so the slices have to be half that width or 1 inch. A 2 inch cut of a 4 inch tall cake is a massive piece of cake so as you increase in height you need to decrease in width in order to get a normal dessert size piece of cake. 

The bottom tier is Mexican Hot Chocolate cake with Chocolate Brownie Buttercream filling. Along with the "standard" wedding type words like Love Honor Cherish, were personal words the couple wanted like their cute "Celebrity Name" of Dashn. Running inside joke with their friends and a way to make the cake so much more personal for just them. I do have a "Cricut" machine which cuts out the letters for me but anyone who owns one of these knows that this is not where the work stops. Once you get the cut outs you have to clean them up. Just like cutting out a wood piece with a saw, you have to sort of "sand" the edges so you get a clean look in the end. It takes a bit more work to get a clean look but, believe me, it's still easier than cutting it all out by hand like I have done in the past.

The middle tier is French Vanilla cake with Strawberry Cream buttercream filling. The Bride loved the look of quilting so I "quilted" the fondant and added candy pearls to it with royal icing. In your local cake store, and maybe even at Michaels, you will find molds and forms for your cake decorating. The template I used basically looks like a plastic rectangle with raised cross hatched lines on it. Once your cake is covered with the buttercream or fondant you let it set up a bit to get a little bit more firm. Then you gently press the template form to the cake to make the impressions. After that I went over the lines with a detail tool so the lines would be uniform in depth. Then I dotted white royal icing at the junctions on each side and, with my special pearl/bead tweezers, I added the pearls. This whole process doesn't take too long but it does take paying attention to detail. You want all of your lines to line up, all to look uniform and all to have the pearl at the junctions. It takes a little time but the effect is so worth it!

The top tier was the hardest tier. It is Red Velvet cake with Vanilla buttercream filling. All of the details on this tier are royal icing. There is no easy way to tell you how to do this type of draping on a cake. Go to Youtube and look up the videos and then just practice over and over again. Keep a moist cake paintbrush at the ready since, as you drape the royal icing, you will have your lines break, over and over again. Just clean it up and do it again until you get the right drape. The trick is to mark the join marks before you start the draping and then meet each mark. The videos will show you how to do this accurately. Once this was done I added all the many little dots from the center of the cake down the sides. These little details are what make the cake so take the time and effort to do them. It's worth it in the end. 

The tiers are all covered in Tiffany Blue Vanilla Marshmallow Fondant. They don't make a "Tiffany Blue" gel food dye yet...although I'm sure someone out there is working on it...so you have to mix your colors yourself. I found that "sky blue" along with a drop or two of "leaf green" works to create the right color of blue. If possible, get a sample from your Bride of her ribbon or, in my case, her wedding invitation. I matched the color exactly to make sure I had it right. Always add less dye than you think you will need since, as the fondant sets up overnight, it will darken a bit and you don't want the color to change too much. 

The white "ribbon" trim is the next part I need to explain. When you cover a cake with fondant you are not covering it on the display board or plate. You cover it on another surface like a turntable and then, after it's decorated, you transfer it to either the board or plate or you stack it on top of another tier. To do this you use a spatula under the cake and when you pull it out from under the cake it WILL pull a bit of the fondant away from the cake. If you have added the ribbon trim before you move your cake then the spatula will put the part of the ribbon off of your cake and you will need to fix it. Instead of having to fix it just wait till you have moved it before adding the trim. This is the same advice if you are trimming with buttercream instead of fondant. So I moved the bottom tier over to the cake board first and then trimmed it with the "ribbon". The other tiers were decorated on a turntable and then stacked before the "ribbon" was added. 

And just a word about stacking. I have to confess that, other than delivering the cake, I hate stacking cakes. Cakes, by the simple reason that they are cake and can't be "perfectly level" and stay that way, are not level. Here are some tricks I use to make it easier. First, when baking, I make sure to trim the cake while it is still in the pan so that right away it is level. I have a mini level that I bought, sterilized, and ONLY use for caking. I use that several times in the process of making the cakes and then again when I stack them. I check them before they go into the wrap and into the freezer, again after I fill them and again after I cover them. (Remember to test your surfaces to make sure they are level as well or your cake will not be level). However, this is cake. It continues to settle as IT wishes even if you check it every step of the way. Not much but enough that when you look at them stacked you will know there is something off even if you can't pinpoint it. You want people to look at your cakes and think "How gorgeous" not "what is wrong with that cake?" So the last trick I use is when I put the dowels into the cakes. Each tier has 4 dowels in it and the dowels and the cake rounds that each tier sits upon are what create the structure that holds up the stacked cake. So the cakes don't sit on top of each other but rather their bases sit upon the dowels of the lower tier. So I place the dowels into the cake and, using a clean new cake round (little pieces of food grade cardboard) set on top of the dowels, I check to see if it is level from several angles. If it is not then I cut new dowels that are taller to adjust the level of the cake. Once it is totally level I remove the new cake round and stack the next tier on top. I continue this process till I reach the top tier. 

Now I have a Cake Safe which you can find at Cakesafe.com which has a steel dowel that goes down into the center of the cake and holds it steady for transport. If the cake has a topper such as a monogram or flowers then you can stack the entire cake and put the center dowel into it for transport. When you arrive just remove it and attach your toppers. If you don't have a cake safe you can use a slightly sharpened dowel as your center dowel and it only needs to be removed for cake service. However, if the cake doesn't have a topper then you will need to insert your center dowel into the lower tiers and stack the top tier on site. Fortunately this one had flowers and a monogram so I was able to transport it the 150 miles to the venue safely with no problems.

The flowers are sugar flowers. Yes, as always, they have to be done a few days ahead so that they are completely dry and solid when needed for the cake. I carried them in a special travel container to the venue and, with royal icing, added them at the event site. The monogram was purchased by the client and then sent to me so I would have it for placement at the venue before event began. There are two ways I have found to make sugar roses. One is with a rose "cutter" that looks like a five petaled flower. You ruffle the edges and sort of "fold" the petals around the center bud. You do this for a few layers to make a full flower with graduating cutters. I'm not fond of this method. Roses have individual petals that each have their own characteristics. I prefer to cut out my own rounds and make each petal individually, ruffle them individually and attach them one at a time. Not everyone's way but it works for me. More work, yes, but worth it to me.
And here is the final presentation at the venue. A wonderful engagement photo sat to one side of the cake and the cutting set and a "Tossing" bouquet (the Bride gave her original bouquet to her Grandmother who was celebrating 56 years of married bliss with the Bride's Grandfather on the same day!) was on the other. It looked right at home and the Bride was thrilled....what more can a caker ask?

So Congrats Ashley and Dan! Hope you are enjoying your Honeymoon!

Next week I'll be sharing a new treat with the recipe!

Cat