Sunday, September 25, 2011

Happy Spider Halloween Cake


Happy Sunday! I'm on vacation this week and next but I'm sharing easy cake ideas for your upcoming parties! This week is Halloween!


You would think this cake would be hard but it wasn't...not at all! The base cake is just a round four inch cake that I didn't level off the dome and covered in fondant "scales" (just round pieces of fondant layered over each other to cover the cake). The face is just a ding dong covered in fondant and attached with dowels and buttercream to the body! The legs are just fondant mixed with tylose then allowed to dry over night after forming them into legs and then attached using water as glue. The hat is a cardboard cone that was covered with colored strips of fondant. The hardest part of the cake was figuring out how to draw the face on so it would show up and not be scary! So if you are thinking about stretching your cake skills with a "carved" or "character" cake then this is the one for you to give a try!


As mentioned before, I do make my own marshmallow fondant and this was no different. I just made it chocolate fondant by using cocoa powder in place of some of the powdered sugar. Learning how to work with fondant is a challenge and can take some time to learn what is the perfect texture and how to correct it if the texture is off in some way. SO for a beginner, who has not learned or is still learning how to make their own fondant, I highly recommend Duff Goldman's brand of fondant at Michaels. It tastes good and is really easy to work with. It is a "soft" fondant which means if you want to make any of your pieces hard to stand up, like the legs on this spider, then you will want to mix in a LOT of tylose and let the pieces set up for at least a week, two weeks if you have the time. But for a beginner this is just the easiest fondant to use for covering a cake. As with any pre-made packaged item, it is expensive. I can make my own chocolate fondant for about $5 and Duff's is priced at $20. So make sure to use that Michaels 40% or, even better, 50% off coupons to help with the cost of this fondant. I use this fondant whenever I need a bright or dark color, other than brown, for a cake. So if you see red or black or navy blue fondant on one of my cakes chances are it's Duffs!


If you are brave, want to learn how to make marshmallow fondant and learn how to work with it just comment here and I'll happily let you know how to make it! Or message me on FaceBook! You can find us at www.facebook.com/thecherryontopevents on FaceBook.


Have a great week! See you next Sunday!


Cat

Sunday, September 18, 2011

Jeff & Amy's Anniversary Cake


Happy Sunday! I hope you like my creation for this Fall Flower themed Anniversary Party! The top tier is Choco Choco Chip Cake with Chocolate Brownie filling. The Bottom Tier is Lemon Chiffon Cake with Lemoncurd Buttercream filling. It's covered in fresh vanilla buttercream, trimmed in green buttercream grass and stems and the flowers and Monogram are fondant.


The only tip I have this week is to place the flowers onto the buttercream while it's still fresh and has not had a chance to fully crust up yet. The buttercream acts like glue. For something heavier like the monogram I actually hid toothpicks at strategic places to hold it up onto the cake.


The Cake Table


We actually worked the event so I get to share with you some of the fun photos from the set up. A lot of people think the cake table just has to have cake on it. Not true! You can add some of the other coordinating elements to help boost up it's visual appeal. In this case I added the "Favor Cake" to the table to help boost the themes colors and fill up the table. The lanterns you see below started out as regular white lanterns and then I simply added strips of scrapbooking adhesive down the ribs and stuck on squares of tissue paper. Too cute!


Close up of the Favor Cake


The favors were simply boxes of M&M's in the themes colors. To help boost the color palate I took strips of the colored tissue paper, all three colors in the boxes, and laid one strip going one direction, one going another direction and the third sort of crumpled into the bottom. Then I added the candy, folded the strips over, alternating colors, and put the top on. This way when the guests opened their favors they would get a burst of the red, orange and yellow colors from the paper and the candy. The boxes you can get at Michaels as well as the ribbon I used for the trim. These were so simple to do but a big hit with the guests.


Orange Fizzy!


And speaking of easy to do! For the drink table we wanted to put out drinks that were family friendly for this family event and yet easy to make adult if the grownups wanted something a bit stronger. So we set up punch bowls of Orange Fizzy and Lemonaid Fizzy, a hit with the kids, and a bottle of vodka for the adults to make their mixed drinks. Perfect! To continue the flower theme we added slices of lemons and oranges with cherry halves on top. The fruits had been "zested" in strips down the sides so that when they were sliced they would have a "petal" effect to them.


Personalized Water Bottles


As Summer drags out into Fall having water available at an event is always a great idea. But why have it just sitting there not adding to the decor or the theme??? We created these personalized water bottles which looked wonderful on the drink table and made for an extra favor to pass out as our guests were leaving. Set in between the two diffferent punch bowls they extended out the theme and added another punch of color to the table!


Speaking of Fall...I get a bit of a break! After a Summer filled with events I get to take a couple of weeks off. BUT I won't be leaving you guys high and dry. I'm going to post each Sunday with some ideas for Fall cakes and cupcakes so you can start to plan for your Halloween parties. I know, I know, it's still 6 weeks away but it will be here before you know it!


You can see all of the event photos, including the entire drink table and the buffet table, to get more ideas for your next party over at our Facebook page! http://www.facebook.com/thecherryontopevents


And speaking of Facebook! Our Prize here goes to Adrienne Fey! I'll be contacting her to see which book she would like for her prize. We'll have another contest in 6 mos and I hope more of you reading this will participate..Adrienne ran off with this!


See you next Sunday!


Cat


Monday, September 12, 2011

Golden Starfish Dinner Party Cupcakes


Happy Monday! Running a day later than normal due to our observance of 9-11. But I have two creations to share with you this week! (Oh, I don't miss the CONTEST at the bottom of this week's blog!)


First up is something that is growing with popularity for my business...Dinner Party Cupcakes! Seem grown ups like the idea of a cupcake but most cupcake designs are for little kids, not adults. So lately I've been tasked with creating grown up versions of these little yummy bites of cake! These cupcakes are Devils Food cake with a brand new version of my chocolate buttercream that we have decided to name Chocolate Brownie Buttercream because of how it tastes...like wonderful rich brownies in icing form! YUM!


Thankfully, the stores are also beginning to realize that we need grown up versions of wrappers and liners and I was able to find these fun gold petal wrappers. Now a wrapper is different from a liner. The liner is the paper cup that you bake your cupcake in the pan with but the wrapper is for after the cupcake is baked but before it's decorated. There are tricks and tips for using these. First off, whether you make them or buy them, you really need to be sure that the buttercream doesn't touch the sides of the wrapper. Buttercream is made with some sort of oil or oils that will stain through the wrapper and destroy your elegant look. Once your cupcake is totally cool then you can place it in the wrapper and then carefully pipe on the buttercream and add the embellishments. In this case I used gold sugar which looked nicely elegant on top and gave some texture while eating! Last part of this process is presentation. Obviously the clients cupcakes went out in a cupcake package for travel but, since the order was for 15 and the recipe makes 24 I had some leftover for my own girls night out so I set it up as you see it in the photo. I chose a square woven tray to set off the gold and the brown and then, once the cupcakes were in place, sprinkled the tray with the gold sugar. This little bit of dressing up helps the wonderful impression of these gorgeous little desserts!


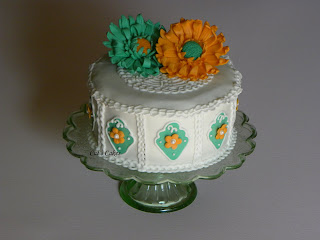
Jackie's Crocheted Birthday Cake


Our second creation of the week was based on the 1970's panel purses. The panels were crocheted then stitched together with more crochet. Thankfully I actually DO crochet so I was able to copy the stitches...and here is how I did it! The first thing I did was mist the crumbcoat of buttercream to help the panels of fondant stick to the sides of the cake. I used 3 inch squares of fondant and let them set up on the cake for a few minutes. Then, using a flower petal cutter (actually part of an orchid cutting set) I cut out the mint green fondant and placed them into the center of each panel using water as "glue". This was as far as I went before starting the royal icing "stitches". The first thing I did was draw the lines down the panels to "join" them. Then I scalloped sideways "c"s down the line on one side then did the same, meeting the loop together, until I got to the bottom of the cake. Now I tried to just make "o"s and then draw a line over it but it didn't look like a stitch so there's no shortcut here unfortunately. Then I did the same process at the bottom but I piped the first line really close to the bottom of the fondant squares so that when I added the final loops they would actually go from the cake to the plate. That was when I piped the outline for the mint panel pieces and placed the tangerine flowers with the pearl candies in the centers. The last thing I did was place the circle on the top of the cake. I cut out a 7 inch round of fondant for a 6 inch cake and then, using my rotary cutter on the textured wheel, I cut around again about a half inch. I placed it on top of the cake and, using a ball tool, helped it to sort of waffle around the edges. This had to set up for awhile before I could pipe the stitching around the edges so while waiting I made the circle decoration on top. This is easier to do if you use a circle cookie cutter and gently press that into the top of the cake. Then you can follow the impression with your tip and have a nice round design. Once the round of fondant had a bit of stiffness to it I was able to pipe the edging stitches and place the flowers.


Now I know a lot of people, and I use to be one of them, don't like royal icing. Well, here's why. Most royal icing I have tasted has been commercially produced without any added flavorings. So it tastes like powdered sugar, which, unfortunately, tastes a bit like cardboard if you don't add flavoring. Come to think of it, that might be why commerically produced fondant doesn't taste all that good! But when you make your own royal icing, or fondant, you can add any flavoring you want it to taste like and it will be GOOD! I usually use vanilla to flavor mine but you can use almond or lemon or strawberry...anything you would think would go well with your cake! This cake is Mexican Hot Chocolate cake with vanilla buttercream filling so the royal icing was flavored with vanilla. Now here is another plus to using royal icing. It dries really hard and crunchy. This turned out to be wonderful texture when eating the soft fluffy cake and soft fondant. Making royal icing is really really easy and you can make yours taste so much better than the commercially produced versions so I hope you will take a chance and give it a try!


This week brings an anniversary cake that I've been working on the pieces for about a month now and just can not wait to see it all come together! We are working this event as well so I'll post lots of photos next Sunday so you can see how it all turned out!


BUT...Before you all go for the week...I have a CONTEST going on with our Facebook site! We are giving away one of three different prizes...YOU get to pick which one you want to win! Just go to http://www.facebook.com/thecherryontopevents and "LIKE" us...then get your friends to "LIKE" us too and post your name on the Wall. The person who gets their name posted the most between now and next Saturday will win the prize of their choice!!! See you on "Cherry"!


Oh...and would you like a second chance to win??? Just post a comment on this week's post telling me which of my cakes is your favorite! I will be drawing one name from this blog to win one of the prizes too! Play here and on Facebook and you could win 2 of the prizes!!


Cat


Sunday, September 4, 2011

Sheri's Fabulous at 40 Cake


Happy Sunday! This week brings a 3 day weekend for me and lots of relaxing time! But it also brought this incredibly fun to make Birthday Cake! The only guidelines I was given was that it had to be black (over the hill motif) and flowers and fun. So this is what I came up with! It was a hit with the client...hopefully just as big a hit at the party today!


Cakes like this LOOK complicated but in fact, what they are is very detailed and not very hard to do. This means they take a lot of time and patience to finish. Step one, of course, is to cover the board with the fondant and let it set up, at least over night, till firm. Then cover the cake and let that sit for at least an hour. After placing the cake onto the board I started on the flowers. When I made the fondant I took sections off of the beginning white loaf, colored those my four colors and then placed those in baggies. The color will darken up and be more vibrant if you let it sit for 24 hours. The Black and the Red fondant for this cake is Duff's Fondant bought from Michaels. The colors are great and it tastes good so I buy that brand. Tip here...wait for a Michaels 40-50% off coupon to buy it since it's a bit spendy!


Now the flowers. I didn't use tylose to firm up the petals because these flowers were going to be eaten and I wanted them soft like the black fondant covering the cake. This does mean they are a bit trickier to get onto the cake! They wanted to move and stretch out. So I made them a bit thicker than normal and I used an offset spatula to place each petal on the cake after I had very lightly brushed it with a damp paintbrush on the backs. The petals that extended past the end of the cake were trimmed immediately level with the bottom of the cake. Once I had placed all the different flowers onto the cake and rolled out my "snake" of red trim I then trimmed the bottom of the cake petals to allow the rolled trim to fit right under them nice and snug. Then the real work began.


I make up huge batches of royal icing and then store them in the fridge in canning jars. I go through it rather quickly but a full batch of royal icing will last me a month. Since they are in individual jars I don't have to expose the whole batch to air (very bad for royal icing since it dries up so quickly) and just use a little at a time when I need it. For this cake I used about a half of a jar that I had colored bright yellow. That went into a piping bag with a #3 writing tip on it. Then, very patiently, I piped on all the lines and dots that you see on the flowers. I would finish one flower, move on to the next and when I was done with the second flower I would go back to the first and gently push down the little points to make them flat. If you try to do this too soon they stick to your finger and pull up the whole dot/line. If you try to do this too late and they will be dry and it will be too late to push down without cracking your design.


I did the trim to the board while all the flowers were setting up. I didn't want to do the writing right away in case I bumped one of the flowers. I wanted the royal icing to set up nice and hard before I tried that. The trim is simply strips that have been cut using the wavy edge of my handheld double wheel cutter. I then used water to "glue" them to the edge of the board (the black extends all the way over the top and sides of the board so you are gluing your trim to the other fondant). Then I embossed them using a small piece of nonskid shelf liner but you can use anything to texturize fondant as long as it's very clean and foodsafe. I used this same technique on some of the flowers on the cake so this tied in the texture from the cake to the trim on the board.


Finally I piped on the words and designs. Now I do this freehand but there are plenty of press sets out there that you can use to gently press the letters into the fondant and then pipe over the outlines.


I hope you enjoyed this weeks' cake! I was a bit out of my element doing a black cake but it turned out so striking that I'm really pleased that I did it! This next week brings some more of the "Dinner Party Cupcakes". These are becoming a hit! I guess grown ups love cupcakes as much as the kids but they want their own grown up version for their parties! Can't wait to share what I have planned for these!


Cat