skip to main |
skip to sidebar
Happy Sunday! Hope everyone had a really wonderful week while I was on vacation. I have to say it felt extremely weird to not have work to do for a whole week and even weirder not to post a blog! I was in Hawaii on The Big Island with family enjoying a getaway that brought about some thoughts about the Destination Weddings I have worked or have been privileged to share with friends this summer.
So many times the Bride and Groom think they have to sacrifice a cool looking or personalized cake because they are having a Destination Wedding or a small wedding that only includes immediate family members. The cake above is a prime example of just such an occasion! This small 8 inch by 3 inch cake feeds just 20 which is perfect for a small wedding of mostly family with just a few friends.
The dark chocolate fudge cake filled with brownie buttercream and covered in vanilla marshmallow fondant fit in perfectly with the black and white themed wedding. The little touches of red echoed the color of the wedding flowers. The only part non-edible on this cake was the banner, the rest was just plain yummy!
Whether you have a smaller wedding or one away from home you can find a bakery to make you a very special cake like this one for your day. And if you have someone in your family who bakes this is an easy design to copy. All you need is a heart shaped cookie cutter, white and red fondant and black sanding sugar.
After I cut out the white hearts I used a pattern press to press in the filigree onto some of the hearts and then I brushed the rest of the white hearts with water and sprinkled them with the sanding sugar. After they were dry I set them out onto the cake and then used black buttercream to pipe on the balloon ties. The last thing I did was add the bow using a toothpick so it would stick easily into the side of the cake.
Finally it was time for the banner. Since banners were used as part of the wedding theme in general I thought a small "Just Married" banner would be adorable on the front of the cake. Since this is non-edible I had to figure out a way to attach it to the cake. Finally I decided to use a toothpick that had been broken in half. The pointed end went into the cake and the broken end was covered with a small ball of red fondant. Not only did it anchor the banner to the cake but it also put another splash of color onto the cake.
Since the design of this cake was fairly simple the cost for it was $3 a slice. Normally my buttercream cakes begin at $3 a slice and the fondant cakes at $4 a slice but this one wasn't my normal 8x4 cake...it was only 8x3 so I only charged the buttercream price instead making this sweet little cake total up to $60. Average wedding cake prices fall between $200 and $600 but this little intimate wedding was anything but average so the small cake, and lower price, was perfect for their event. Personalized doesn't mean expensive, it means that your cake artist works with your budget to give you a personal cake that fits your event. Most cake artists will be able to work with your budget or give you options for your budget so you can afford your cake and eat it too! Just ask.
See you next week when I will share with you some delicious Dinner Party Cupcakes!
Cat
Happy Sunday! Today it's all about Cupcakes! Ok, cupcakes and cupcake LINERS! This week I had lemon cupcakes on the docket with plain old vanilla buttercream. Yup, it tastes very well together but can look fairly boring. That is until you add a fancy wrapper and bow!
In the past few years cupcake liners have really made a change. Before you could buy the pastel colored ones. Pink, blue, green, yellow and white came all in one package. And I do still use these quite a bit. Your other alternative was the foil liners that come with a really thin white inner liner. These can look very cool all by themselves but invariably I get burned on them so they are not a favorite of mine. But since the "revolution" of cupcake liners there are getting to be more and more available in the store....yup, the regular old grocery store...that you can buy and turn your every day cupcake into a mini work of art.
One of the complaints I hear from clients is that they could bake a cupcake but not have it turn out like one of mine. Part of it is the ingredients I use. So the taste of the cake. But, mostly, it seems that what they really like are the look of the cupcakes. This week was no different. Small birthday party for a 2 year old. She wanted "Minnie Mouse" cupcakes. I suggested the ones above but with mini cookies for the ears but she didn't want to take a chance of the little ones in the group choking on the pieces. So I promised I would make the icing a bit more fancy and keep the bows and polka dots.
The bows are just thin strips of fondant folded over into the middle and then another strip for the center piece. That's it. Really. It is really that simple. I used a 1M tip for the piping and just piped strips of buttercream from the outside edge into the middle and then stuck the bow right on top. And while the bow would have been cute on a cupcake in a white liner it is the red and white polka dot liner that says "Minnie Mouse".
Here are a few of my favorite liners I have used over the past few years...
The red of the liner really works to coordinate with the little lady bug on the topper. Just that hint of red made all the difference.
There are fun themed liners as well. These Gingerbread Men liners helped to add even more whimsy to these reindeer cupcakes for a Christmas Party last year.
They can add a bit of elegance to the party as well. These sweet little heart patterned liners really set off the simple yellow cake and vanilla buttercream cupcakes and coordinated beautifully with the little fondant arrows.
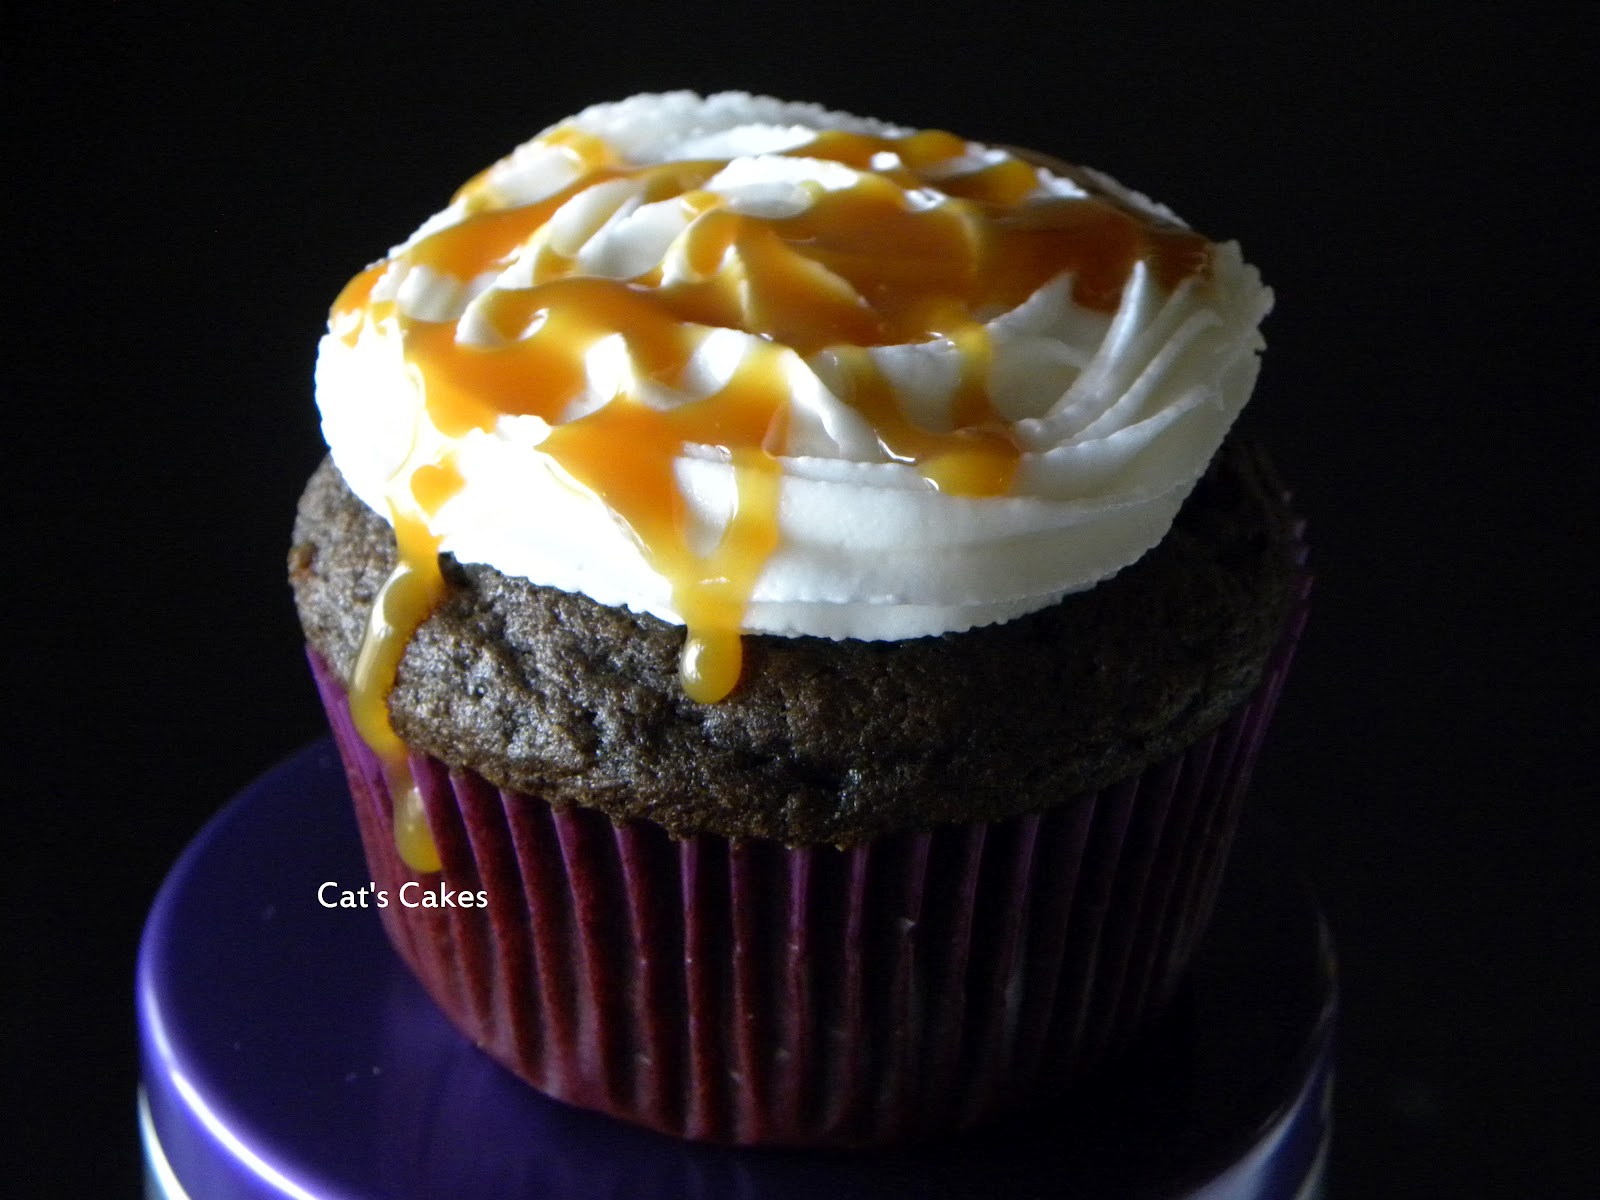
Sometimes it's a mood you are trying to set. You want to be funny or romantic or elegant. These cupcakes were meant to just look sinful. Mexican Hot Chocolate cupcakes filled with caramel then topped with buttercream and drizzled with caramel...no, a plain white wrapper would not have done them justice. But this dark purple one sets the decadence off just right.
The other fun product out there are cupcake wrappers! Bake the cupcakes in any type of liner and then slip them into this outside wrapper for maximum effect. The "popcorn" cupcakes were baked in plain white wrappers and then put into the striped wrappers before the marshmallow "popcorn" was added on top. Too fun!
Wrappers also span the range between funny and elegant. These chocolate starfish cupcakes are perfectly adorned by these gold wrappers that pick up the gold sugar that was sprinkled on top. Very elegant indeed.
So the next time you need to bring cupcakes take a few minutes to browse the liners at your local cake store or craft store...or even your grocery store aisle! It is a lot easier to have a fun looking, or elegant looking, cupcake than ever before!
Speaking of elegant...my order this week is for ganache! Can't wait to share this sinful cake with you next Sunday!
Cat
Happy Sunday and Happy Father's Day to those "Down Under"! Hope you are having a fun time celebrating with your families! Today I bring you a Baby Shower cake from last weekend.
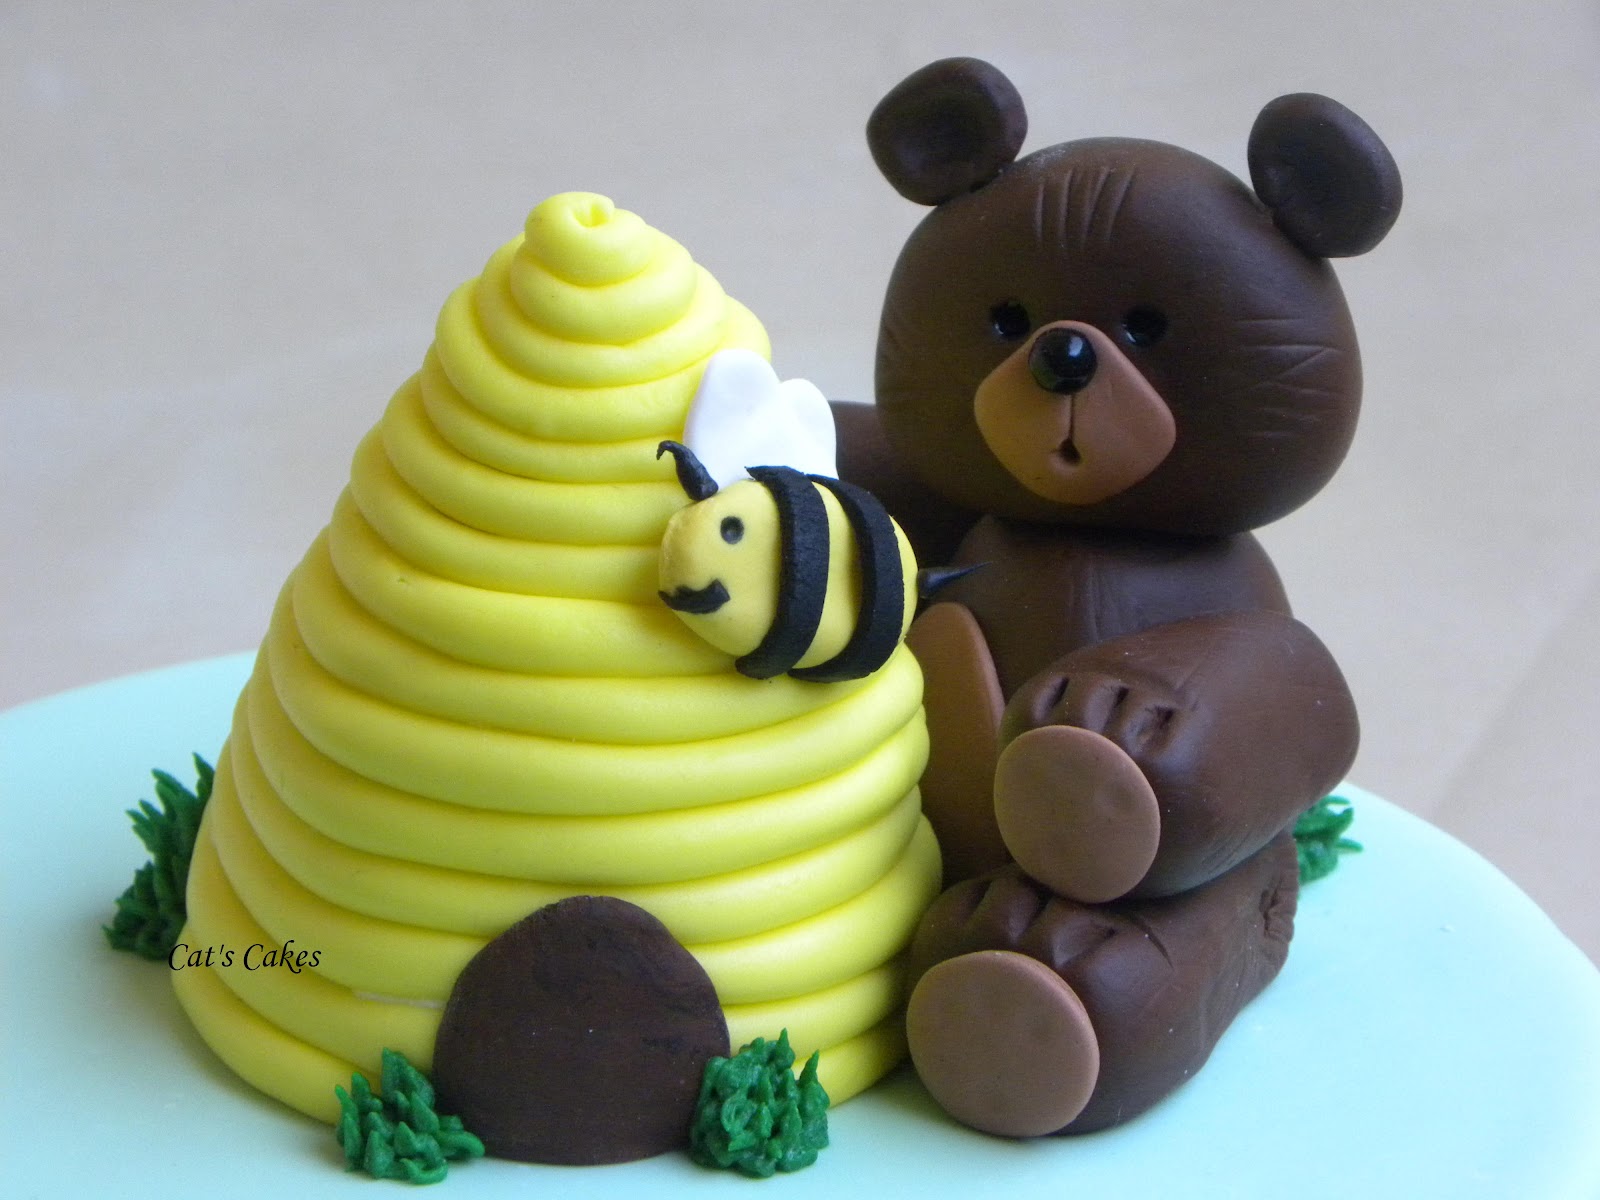
The Theme was bears and bees and since this is their second child they wanted to make sure the first child wasn't left out so we incorporated little details just for her into the cake. The cake is a lemon chiffon with both fresh sliced strawberries and strawberry preserves for the filling. Everything on the outside of the cake is fondant except for the "grass" which is piped buttercream.
One of the "secrets" of this cake is the ribbon around the middle. For many cakers the biggest frustration is the filling "bulge". And with fresh fruit cakes there just doesn't seem to be a way around it. Once the cake settles, the fruit slides and pushes out the buttercream "dam" and you end up with a bulge. Even after you have cleaned up that bulge, once you put the fondant on top the weight of that is going to make the cake settle and yup, you guessed it, bulge. But if you can place some sort of decoration at that point of the cake then you have a chance of camouflaging it as I did with the ribbon. Is there still a bulge...yup but it looks just fine with the ribbon over it.

The other part of the details which disguises the bulge is the bees. Just little half rolls of yellow fondant with black stripes and details, these little guys took the better part of an afternoon to do just because the details are so small. I rolled out white fondant really thin and then cut small circles and gently stretched them out to make the wings. Then I layered two together and placed them on the cake where I wanted to place a bee and then just stuck the bee on top. Once all the bees were in place I added the "trails" from one bee to the other all the way around the cake. These bees were a hit with the other kids at the party. One little boy said he needed another one to eat because his first one "flew away" LOL!
The bow is also fondant and I mixed just a bit of tylose into the fondant to help it dry up quickly. I rolled out a strip of the fondant and then pinched/rolled the center. I then used the handles of two of my fondant tools as a brace as I rolled the ends of the strip back to the middle. I let that set up for a few moments so the water I used as glue could work and then flipped the bow over and fluffed it up a bit. Once the bow was completely dry I was able to remove the tools and have a stand up bow. At that point I added the middle bow piece and added it to the cake. The plaque is just thick white fondant with a thin piece of blue layered on top.

Finally we get to the topper. Here is the other "secret" of this cake. The bee hive is actually a hidden cupcake! This was the first child's own personal part of the cake. She was delighted! To make this I just cut off part of the dome on the cupcake so it would sit flat upside down on the cake board. Then I crumbcoated it with buttercream and finally covered it with the yellow fondant "snakes" to make the hive. Of course at the bottom of the cupcake, which is now the top since we turned it upside down, is flat so I rolled up a fondant egg and put that on top so I could continue the hive cone. When we served it to the little girl we removed the top of the cone so she was left with fondant and cupcake only.
The bear is the same one I covered a few weeks ago in the tutorial. He is a keepsake. When you let fondant dry out enough it becomes hard as a rock. It's mainly sugar after all. This you can keep in a low humidity place for, literally, forever. And because every part of him is toothpicked together he will stay put together. A fun keepsake from the party once it is over.
And speaking of the party! I will be covering that one tomorrow on the Cherry Party Blog, http://thecherryontopevents.blogspot.com/ ,
so make sure to check that one out tomorrow for some great Baby Shower ideas!
See you next week!
Cat