Saturday, June 25, 2011

Step One: Making Miniature Picnic Baskets


Happy Sunday! Today's post is all about the work that goes into making the little sugarpaste pieces that go on a custom cake. One of the most common questions I get about custom cakes is why they cost so much. A "grocery store" cake is typically a standard buttercream and takes all of 20 mins to make...not including baking time. You do a quick icing job then pipe around the cake, using a textured tip, and trim with another textured tip...top with buttercream flowers and you are done. A custom cake often has sugarpaste pieces that go on it as well as intricate piping that could take days for the pieces and hours for the piping. Today's project is an example of the work that goes into a custom sugarpaste piece. I have an order for 30 custom cupcakes coming up in two weeks so I'm working on the sugar pieces that go on top. I begin with marshmallow fondant (which is marshmallows and powdered sugar) and add tylose to it so it will dry quickly. I formed a "snake" out of it and cut more or less the same size pieces for my baskets. I rolled them into balls then, using the matt as my flat surface, I gently squared off the sides to make rectangles. Then I used the exacto knife to gently score the "lid" of the basket. Then let them dry overnight.


Step Two: Basecoat of the "paint"


Next comes the painting of the "wood" color. This is just vodka, or any clear alcohol, and gell food dye. In this case, chocolate brown was used for my primary wood coloring. This takes a few coats and you have to let them set up and sort of dry to a tacky finish between each coat. I used the exacto knife to score the center of the lid after the first coat went on so that the color of the second coat would help define the lid opening. Once again, these need to set up and dry overnight.


Step Three: Detail painting


Using a regular brown "paint" I used a detail brush to paint on the basket weave lines. I had saved my paint from the night before to help brush out anywhere the original paint color didn't cover evenly. Then I let it set up again overnight.


Final Step: Adding the "leather" straps

Day three of this project and I'm finally to the "leather" straps of the baskets. This is just a darker colored fondant that's been mixed with a whole lotta tylose so it dries very very quickly. It's rolled out thin and trimmed into a square of 3 inches wide by 4 inches long. Then that is divided into 1-1/2 inch by 4 inch sections and then strips are cut..making each strip 1-1/2 inches long. They are pressed onto the basket and using a skewer I positioned them so that they are in a "carry away" position. Then let them finish drying. You will only have a few minutes to mess with the straps before they are dry to use the skewer to arrange them into whatever position you want them very quickly.


So there are the baskets, completed and ready to go onto the mini tableclothes I made along with the flowers and grass. So before the cupcakes are even baked I have spent at least 3 hours making the pieces as well as 3 days of drying time for the handpainting. I'll post the completed cupcakes the weekend of the 9th! In the meantime all of this has to dry solid so after the cupcakes are baked and iced I can simply top them off with their mini cake toppers for presentation!


Next weekend is the weekend of the 4th...only one cake that weekend but I have grand plans! Can't wait to see how a new technique turns out!


Cat

Sunday, June 19, 2011

Star Trek Father's Day Cake


Happy Sunday and HAPPY FATHER'S DAY! This week's cake is for the Father's in my life. Both my husband and my son-in-law are Star Trek fans. Unfortunately I don't get to make these cakes for clients since it's copyrighted (can't make money off of copyrighted items) but I DO get to make them for family! And this one was fun to do but a challenge when you know you are going to be critiqued by true fans. In fact, there's a third Trekkie coming to dinner who will be taking a look too!

This cake is handcarved from a half sheet cake. It's yellow cake with vanilla buttercream filling and then covered in buttercream and then fondant. The fondant was handpainted with two colors of gold and trimmed in black. The black was shiny and picked up the gold off the board so that it looks like there is gold in the trim but it's solid black. As I have mentioned before, it's easy to paint on fondant. You just use a clear alcohol of some sort, like vodka or clear vanilla, and mix it with either luster dust or gel food colors to make a thin paint consistancy then paint on in layers. For this cake I painted on a darker "old" gold luster dust paint and then a shiny "new" gold over that to give it a bit more depth and add to the design of the insignia. Just make sure to stop and let the paint dry between coats or the new coat will start to "pick up" the old coat and you won't get an even surface.

The "secret" this week is about carving. I always freeze my cakes (bake, cool, torte or level as needed then wrap well with cling wrap or, my favorite "Press and Seal" wrap then freeze over night up to one month) because it gives moisture inside the cake that makes it taste much better. But for carving freezing is a must. The cake doesn't have to be hard frozen but it helps. I use a serrated bread knife for the large cuts and a small paring knife for the fine cuts. This is much easier to do when the cake is solid and not soft like it is when it has thawed out. You can either fill the cake before or after carving, your choice. I usually fill before carving but in this case, with such a flat cake, it was easier to fill after. Anything with fine edges or curves should be carved after filling. Then I covered it with a crumbcoat and let it sit overnight to thaw and settle. It doesn't have to be that long, you can wait 3 hours and then finish but I prefer to let it settle overnight when time allows.

There are two reasons for waiting for the cake to thaw and settle. If you try to put the final buttercream or fondant layer on a frozen cake, as it thaws it will release gasses that can escape the crumbcoat layer but not the final layer and you can end up with gas bubbles on your cake. In buttercream they will pop and part of your buttercream will just suddenly fall off your cake. In fondant it will make a huge bubble on the side of the cake and even if you pop it you will not be able to smooth it out. The second reason to let it sit for awhile is to allow the spaces in the filling part of the cake to settle. Some of your filling could squish out and create a bulge around the middle of your cake. If you wait till it settles then you can smooth this bulge out and have a smooth cake side.

Last tip that someone gave me this week on frosting a cake. When you finish frosting with buttercream, before adding the final trim of frosting or ribbon to the bottom, run an offset spatula between the cake board and the cake, just an inch or so from the edge, to break the seal. This will allow any trapped gas or air to escape. Give that an hour or so then trim as normal. This helps the gas/air to escape from between the crumbcoat and final buttercream layer. If you are covering your cake in fondant remember to either mist the cake with water or spread on piping gell so the fondant will adhere to your cake. By the time the cake has set for 3-24 hours the buttercream crumbcoat will be dry and the fondant will have nothing to stick to so make sure to moisten it so it will.

Next week I begin work on miniatures for cupcakes that are coming up early next month for a family reunion. I'll share with you the steps and the final products next Sunday!

In the meantime we are going to have a great day filled with BBQ, yummy cake and two great Father's to honor!

Cat

Sunday, June 12, 2011

Goofy Themed Grad Cake

This week's cake was a Graduation Cake for a special Grad I've been blessed to get to know over the past 4 years. This kid is something special so it was a wonderful thing to get to design and then present his High School Grad Cake to him this weekend.


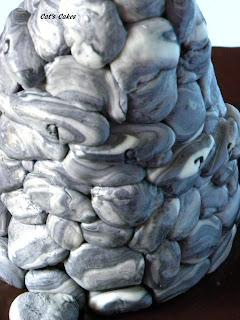
We are all Disney Fans in both families but due to copyright law I can't make a Disney figure without their permission...easier to buy Trump Towers...so I needed to fit the licensed figurine into the design instead. Well, this kid has had some uphill climbs in his life and this was a big one for him to finally reach the top so the idea was to have his favorite character standing on top of the mountain of boulders, each step noting a year of school that he completed. You can see a close up of the steps below: And he's a chocolate fan...ok, he's beyond a fan...so there was no question on what flavor the cake was going to be. I have made him my "there can't be too much chocolate cake" cake and he ate it up with delight so my challenge here was to top THAT cake with even MORE chocolate! The answer seemed clear...top my normal chocolately cake with ganache! YUM! So this cake is my triple chocolate cake with fresh chocolate buttercream filling then covered with chocolate buttercream and finally topped with a thick layer of chocolate ganache. That was the ticket! The Grad and his family loved the cake...and that was, after all, the goal. So Happy Graduation Nick! We are proud of you!!


Ok, so each week I share a "secret". Well, this weeks secret is for the more advanced caker. For the boulders I "marbled" fondant. I used white fondant then with skewers I spread on lines of cream, brown and black gel food coloring then gently kneaded it into the white, making sure to only make a few turns. Then I flattened it out and drew more lines of black. This is because I wanted the predominate color of the boulders to be grey. Finally I made a snake of that marbled fondant and a snake of white fondant and laid them side by side. Then twisted them, flattened them out and twisted again. Finally I was able to make a snake, cut it in half (so one side is flat, one rounded) and mould the boulders out of that. Finally, once they were all in place on the cake (yup, there's frosted cake under there) I used a misting spray bottle to spray the boulders to give them a bit of shine. Give it a try..it's a LOT of fun!


This upcoming week brings Father's Day and a very special First Father's Day Cake! Can't wait to share it with you next Sunday!


Cat


Monday, June 6, 2011

Salzburg Old Town Waterfront


Hello everyone! I'm back from my incredible Castle Tour in Europe! As promised, here are some of the best photos. Above is the Salzburg Castle up on the hill overlooking the gorgeous Old Town. The whole city is a gem to be admired but this was my favorite shot of Salzburg. (just click on the photo to see the larger view)


Neuschwanstein Castle


The highlight of this trip for me was Neuschwanstein Castle. The castle in Disneyland was modeled after this real life castle in Germany. It is truly the most romantic castle I have ever seen. You can really see how the heroic and romantic knights tales were created from sights such as these!


Lucern


And, finally, my favorite city, Lucern. You have to love a place that has so much amazing architecture and swans swimming in the lake! Of course the Alps towering over it certainly helps! It's not a large city and we were blessed to be staying near the heart of it so walking tours were wonderful!


Giraffe Bridal Shower Cake


But, finally, I'm back home and back at work. This week features a Bridal Shower cake for a special client. She is having a destination wedding (with a marvelous wedding package) that, unfortunately, does include cake but doesn't include a custom cake so we created one for her Bridal Shower instead. The Bride-to-be loves giraffes so it was a cute personal touch to make these for the cake topper. They are hand moulded from sugar paste and fondant and are completely edible. The daisies echoed the theme of the entire shower as did the colors yellow and brown.


This week's secret is a simple one. If you look on the sides of the cake you will see the sugar daisies along with the ones piped onto the cake. All I did to make sure I got uniform flowers was to use a cookie cutter daisy, in two sizes, and after letting the buttercream frosting firm up for an hour, gently pressed the cutter into the frosting and then, using royal icing which dries quickly, just piped over the outline! Easy peasy!


This upcoming week bring Graduation in our area and a special grad cake for a Disney fan! Also, a quick thank you for anyone who has been reading this blog over the past year! Yup, it's been a whole year since my first post! Hopefully I can keep coming up with interesting cakes and tips to keep your reading for at least one more! Do me a favor and post a comment to this post if you have been reading since last June! Thanx!


See you Sunday!


Cat