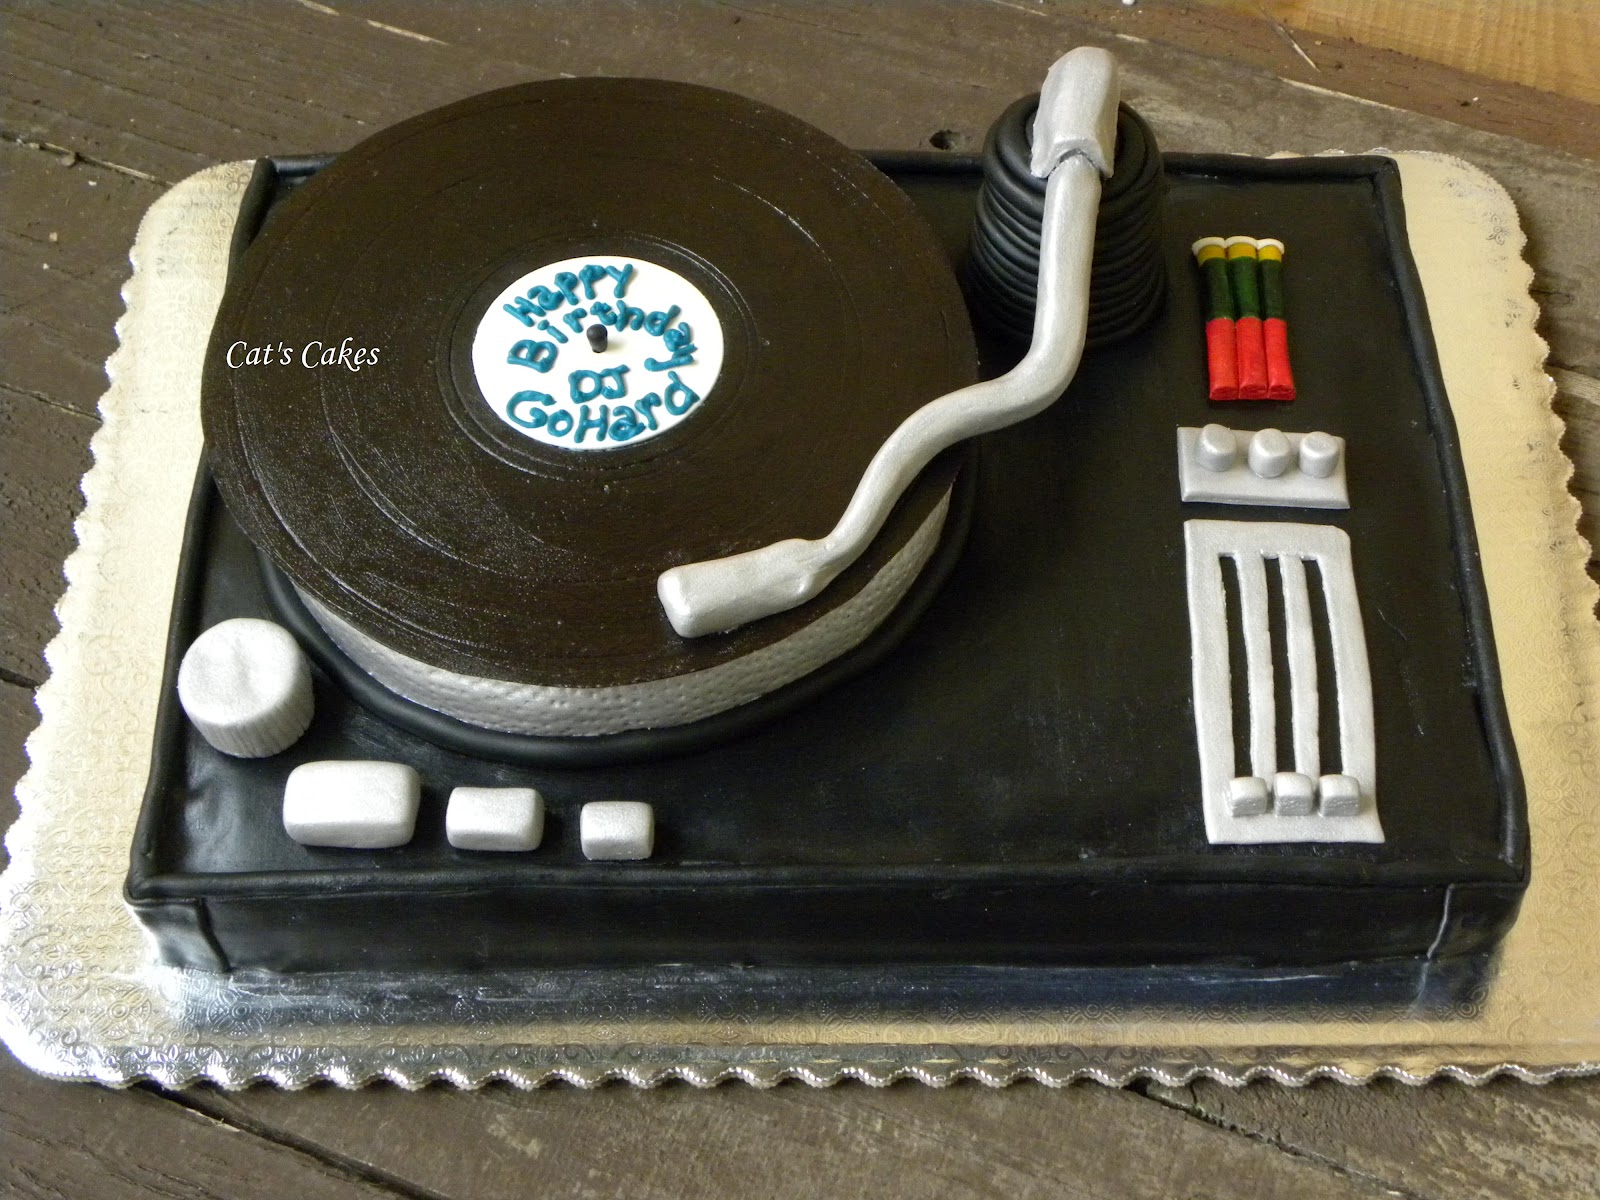
This "Turntable" cake was for a client's boyfriend. He is a DJ so she wanted to go with that theme. I researched a lot of cakes and the one thing I didn't like about most of them is that they had really rounded corners. This is due to draping the fondant over the cake like a sheet. It rounds the corners and, unless you do a lot of work smoothing them, you don't end up with nice crisp squared off corners. Unless you "panel" your cake instead.
This is what I chose to do in order to get this to look like a real rectangular turntable. I used Duff's Black Fondant, which is my preferred fondant when I have a black, red or bright colored cake. The issue is that it is a really "soft" fondant so it tends to stretch when you pick it up unless you let it sit and dry out a bit. I didn't want to take that time so what I did was to cut the strips I wanted, lightly dust them with powdered sugar, and then rolled them up and then unrolled them onto the side of the cake. Once I had it smoothed down with a smoothing tool to the cake I then trimmed the top and sides to make them even and straight. After each side was done I finally put down the top panel and smoothed it into place. Finally I added corner "guards" and trim.
There are a few ways to make a cake "shiny". I wanted this to look matt but have a gleam to it so I simply used a teeny bit of crisco and a wide brush to paint it onto the surface. The crisco "melts" any left over powdered sugar and then sinks into the fondant helping to make it have a bit of sheen as well as keep it soft. You can use an edible lacquer to make it really shiny if you are looking for a "plastic" finish. With most cakes a bit of water will help make it shiny as well. Not a high shiny finish like the edible lacquer but more shiny than the crisco method. The problem is that you have to be really sure to get the coating even but keep it really light as well. Too much water and you melt your fondant, not enough and you get blotchy, not shiny. With white fondant I tend to use water, with darker fondant I tend to use crisco. I have yet to need the edible lacquer but I hear it's an amazing finish!
Except for the actual turntable part of the cake I made all of the other pieces a week in advance. That was to allow me time to get them really solidly dry and stiff but also to allow me to paint them in several coats. For all of the silver pieces I did start out with light gray fondant so it made it a bit easier but even so it took about 3 coats of silver to make it really look metallic. The record is still Duff's Black Fondant but I added a bunch of tylose and then rolled it out thin and cut it into the circle. I then used other circle cutters to make the track sections. Finally, when it was totally dry I used crisco and a paint brush to make the "lines" on the record. Last touch was the "label" which I let dry for a day before adding it to the record. This was so it wouldn't change shape as I was adding it on but stay nice and round. Then I was ready for the wording.
There is an inedible part of the cake that you can't see. The "arm spring" is actually black fondant wrapped around a mini plastic cup. I needed something really sturdy to hold up the arm. Nothing I tried was looking the way I wanted it to look so finally I decided I needed something solid to do the trick. It worked perfectly!
As you may notice, this is actually a "tiered" cake. There is the rectangular tier and then the round tier on top. It is supported just like you would any tiered cake, with dowels and a cake board. The round cake was baked, carved and covered all by itself and then added onto the other tier after the silver "paint" was totally dry. The round tier was topped with black fondant, the sides were the gray fondant that I added indentions to before painting silver. After it was on the bottom tier I added the black rope trim to help adhere it to the "case" and make it all more stable.
A word about transporting. I added some crinkled up Press & Seal under the "Arm" to hold it in place for the 150 mile delivery. It was very sturdy but the vibrations of the freeway can jiggle pieces loose so I wanted to make sure it would make it to the client ok. In fact, right where the arm meets it's housing there was a teeny crack beginning to form so I'm sure that if I had not supported it then that crack would have been huge, not teeny, by the time we reached the clients home. So make sure that if you are making a cake that has this type of "hanging" decorative piece on it that you support it for any transportation.
This upcoming week brings our 10 yr old son his 11th Birthday Cake! It has an Angry Birds theme and I can't wait to share it with you!
Cat
I’ve read some good stuff here. Definitely worth bookmarking for revisiting. I surprise how much effort you put to create such a great informative website. alabama diaper cake
ReplyDelete