Happy Sunday! Well this week brought me a fun time making up a dessert plate and so I thought I'd share each item with you and how to make it as well as present it. This was a week off for me and my own family dinner was the only "work" on the table so it was fun to get together a dessert that the entire family (15 people attended!) could enjoy.
First up were the Cream Cheese Balls. These we saw years ago at a Fondue restaurant named La Fondue in Saratoga California. They are like mini cheesecakes and OH so good! Take a small spoon, I actually have a little gold "tea" spoon like you would use if you were throwing a High Tea, scoop a small bit of cream cheese up and then roll it into a ball in your hand. Drop it into some graham cracker crumbs (these you can get on the baking aisle already ground up) and roll till covered. Stick in a toothpick and dip it into the chocolate and set onto a plate that's been lined with parchment paper. These will go into the freezer for a few minutes before you will be able to pop them off the paper and onto your tray.
Next up are these SO delicious S'mores Pops. All you do is put marshmallows onto skewers or lollipop sticks (even Popsicle sticks will work) and dip them into the chocolate and then roll them into the graham crackers. These were a huge hit at the party!
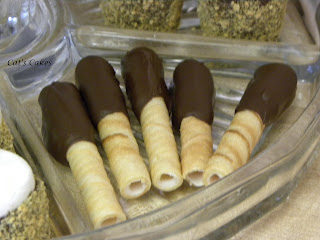
For those who were not marshmallow lovers I wanted to put something chocolate covered on the plate that they would enjoy. These round cookies are filled with vanilla cream. They come in a package, each about 8 inches long and in various flavors so pick whichever fits in with your party. I cut them in half and dipped the cut half into the chocolate, placed these on the parchment lined plate along with the cream cheese balls and put the plate into the freezer for 10 minutes.
Last on the list was Chocolate Dipped Strawberries. These are always a hit at any party I have ever thrown and they are easier than you think. The real trick here is letting them set up. I use cups to hold up the strawberries until they are totally dry before putting them into the presentation. Now I put one of them in before it was totally dry to show you how they look before totally set up and how they look after. Shiny is still unset and the mat finish is totally set. Now to do them all you have to do, after washing and drying the fruit, is put the skewer (that has had the pointed end cut off...you don't want your guest poking themselves when they take a bite) into the end of the strawberry. This is why you leave the green part on the strawberry, to help anchor your skewer. Dip it in, tip first, till the strawberry is covered 3/4 of the way in chocolate. Lift it straight out and move it around in a circular motion. This gets rid of the excess chocolate and forms the cute little curly-Q on the top. Then set it into a jar or cup that is deep enough so that most of the skewer is inside the cup and only a bit is showing. This will hold your strawberries quite stable while they set up.
While waiting for the strawberries I set up my tray with the rest of the treats. My tray, in this case, is actually a cake stand that had been turned upside down. Now this particular cake stand is made for this purpose and has the different divided wells for serving different foods but I think you could use any cake stand that has a lip on it to keep the food from sliding off. I removed the treats from the freezer and placed them in their wells and after the strawberries had set up I placed them into a mound of fondant to keep the skewers upright like a flower centerpiece. If you like you can just cut your skewers shorter so that the strawberries can rest on the lip of the middle piece like they did in the cups. You can also use part of a styrofoam ball, oasis, or clay you may have around to help hold them into place. When removing them just remind your guests to spin the stick first, to release it from what is holding it, and then pull up.
I always use the best grade of chopped chocolate that I can afford but a bag of chocolate chips melted over a double boiler or in the microwave would work just as well. I used a double boiler so it kept the chocolate nice and smooth the entire time I was dipping but when working with smaller amounts of treats I have used the microwave technique. You just have to be very careful not to leave the chocolate in the microwave too long because it can burn quickly. As with all chocolate melting, be sure not to get any water into the chocolate or it will seize up and you will have to start over again.
This upcoming week brings another dinner party for clients who have not yet been able to get together to celebrate the holidays so that means Dinner Party Cupcakes! This is the third order for the same client so I have to come up with something completely new...a real challenge that I can not wait to tackle! See you next Sunday!
Cat
Sunday, January 22, 2012
Subscribe to:
Post Comments (Atom)


Those strawberries look delicious!
ReplyDelete