Saturday, December 31, 2011

 HAPPY NEW YEAR 2012! This weeks cake is for a small dinner party. The "theme" is silver and blue shimmer so I had to come up with a cake I thought would match the look of the theme. The cake is a strawberry and white marble cake and it's covered in a cream cheese frosting and then vanilla marshmallow fondant! The "bubbles" are actually candy pearls and the numbers are rolled blue fondant that's been covered in blue sanding sugar. Only the curly ribbon (which is part of the party decor) is non edible. 


The ruffles of this cake are just strips of fondant that have been cut using a ruffled wheel cutter then folded in wavy ruffles around the cake. The "bubbles" were added by lightly brushing the fondant with water and then letting that act as glue for the candy. I used an extruder (handy little device that looks like a garlic press but with screens that have different cut outs) for the numbers but you could just roll out fondant snakes. The extruder just makes the process faster. Like the bubbles, I used a thin coat of water on the numbers and then added the sanding sugar. The ribbon is actually tied to a toothpick and then set into the cake so it can be easily removed for service.  


You will be able to see more photos of the party set up on Facebook tomorrow. Just go to: www.facebook.com/thecherryontopevents to see how the cake fit into the party decor.
This week I was able to play with a few recipes as well. Making anything vegan taste as good as the regular version is a challenge but every now and then I come up with a new version that is lower in fat, calories but tastes really good too! Most of the time this requires the removal of the oil and eggs. Unfortunately it can also change the texture of the baked good and that can effect the way it tastes. This week I made a change to my normal chocolate chip cookie recipe. I took out the eggs and butter and replaced them with pumpkin puree instead! And they are SO yummy! The bonus here is that they are vegan too. So here is your recipe of the week...lower in fat, lower in calories and a great trade off for a chocolate chip cookie!


Pumpkin Chocolate Chip Cookies


15oz can pumpkin
1-1/2 cup brown sugar
1 cup white sugar
1-1/2 tsp vanilla
3 cups flour
1-1/2 tsp baking soda
1 tsp salt
1 bag chocolate chips
Mix all wet ingredients together in a large bowl. In another bowl mix all dry ingredients, except chips, together well. Then mix in dry ingredients with the wet ingredients will well combined. Add chips. Scoop out onto a heated baking stone by 1 TBS scoops. Bake 15-20 mins till golden brown. These are cake like cookies so they don't flatten out, they stay round and puffed up.

I hope you have a wonderful time celebrating tonight and ringing in 2012! Hope the next year finds you happier than the last one with more of your dreams coming true. I'll see you next week!

Cat

Saturday, December 24, 2011

 MERRY CHRISTMAS! This week was FILLED with Christmas Treats going out to everyone from my family to a Dojo to a Senior Center. And it's been so much fun making them and then presenting them to everyone. 


We start out with a Dessert Tray filled with all sorts of Treats. The crystal bowl holds the salty sweet treat of Rolo Bites. These are simply mini pretzels that have had a Rolo melted on top for about 5 minutes at 350 degrees and then a M&M smooshed right on top. (yes, that IS a technical term! LOL!) These are so good you really have to watch yourself so you don't eat the entire bowl! Next up are Marshmallow Pops and Marshmallow Bites. These are dipped in Dark and White chocolate and then either rolled in nuts or sprinkled with sanding sugar and some even got some M&M's added on top. YUM! Last, but certainly not least, are the Chocolate Dipped Pretzel Sticks. These are also rolled in Dark and White Chocolate and then rolled in nuts or sprinkled with sanding sugar. All in all this has something for just about everyone!
 Next up are these adorable little Reindeer Cupcakes. With Mini Nilla Wafers for muzzles, broken Mini Pretzels for antlers and M&M's for eyes and Mini M&M's for noses, these delicious yellow cupcakes are SO good. The client simply adored them and these are grown men who gushed over them! Of course Christmas Treats bring out the little kid in all of us so it's totally understandable!
Finally the same type of cupcake was simply decorated with "light strings" and Mini M&M's as the light bulbs. This set was for the Seniors and they were simply delighted. Christmas Treats are not something they get every day so we make sure that they do get some at least one day every single year. Just a little community service and a lot of Christmas Cheer for some truly wonderful people.


For my family I also added in some fudge so everyone will have plenty of chocolate to snack on over the next three days! I hope you find yourself surrounded by family and friends whether you celebrate Christmas or not. I hope you find lots of love and generosity in your life and can welcome in the New Year with the hope of new beginnings and lots of really good times to come!


As for me...well, I'll see you next Sunday...we still have New Year's Eve to come!

Cat

Sunday, December 18, 2011

 Holiday Marshmallow Pops

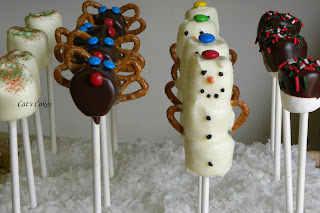
Happy Sunday! This week brought me one of many parties that required non cake like treats. So I started surfing the web to find something that caught my eye and found my answer on TV instead! LOL! I was watching Regis & Kelly one morning and they featured a woman who did marshmallow pops. Now she was designing for Halloween (yes, planning for Christmas starts in October) but it got my head thinking about what I could do for Christmas. 

The only "trick" to doing marshmallow pops is to allow the chocolate to set up a bit before adding anything to it. Anything sugar based will melt if the chocolate is still too warm and it melts right into the chocolate and you can't see it. Yes, this was trial and error and I "disappeared" the ones I messed up on....yup, yummy!
 First thing I did was put all my marshmallows onto the candy sticks and then put those through the spaces of a wire rack to keep them upright. Then I dipped all the chocolate pieces and while they were setting up I dipped all the white chocolate pieces. As I finished decorating the dark chocolate pops I moved them to another wire rack to allow them to dry and give myself some decorating space. 


The snowmen were three marshmallows all dipped at the same time. I let them sit up for a couple of minutes then sprinkled them with very light blue sanding sugar so they would sparkle. Then I used pieces of candy corn, cut into triangles, for the noses and black tinted butter cream and a fine tip to make the pieces of "coal" for the face and buttons. Finally, using a toothpick dipped into the white chocolate, I attached the M&M's like little caps on the top. Once all that was done I broke mini pretzels into separate little curved pieces and dipped the ends into the white chocolate and then placed them onto the snowmen and they were done!
The reindeer I actually saw on a website called Pinterest. They were a bit more tricky. I had to let the chocolate set up before attaching the mini pretzels but found out that if you wait too long the chocolate won't hold and you then have to dip the pretzel into the chocolate and then hold the reindeer upside down while the chocolate sets...otherwise your antlers sadly slip down the head and onto the floor and you get to start over again. After the antlers were in place I just used chocolate mini M&M's for the eyes and nose. I let the logo face up for the eyes to help create a little character but hid it for the Rudolph nose. Too cute!


The others were just decorated with sprinkles of different types but you could use ground nuts or candy of any sort and they would still be completely cute and yummy! I had a lot of fun with this project and will most certainly be pulling this out again soon for all sorts of occasions. I put 3/4 of the order into a piece of styrofoam I had covered with coconut shavings and the other 1/4 were packed up in celophane bags and tied with ribbons to make it easy for some guests to take them home instead of eating them at the party. They were a huge hit! 


Next week you will see more cake and non cake goodies with a Christmas theme! Can't wait to share!

Cat

Sunday, December 4, 2011

Peppermint Candy Holiday Cake

Happy Sunday! Sorry the blog is so late today...Blogger.com has gone through some changes and it's made it harder on me to get these posts online. I'm sure they will work out the bugs soon. If you have any issues reading this blog please do comment to let me know!

The cake this week is a "Party Cake". It's a 10 inch by 2 inch  two layer cake. White cake with vanilla bavarian cream filling! Most party cakes are on tier because they are not meant to feed a lot of guests. A 10x4 feeds a little over 45 so a 10x2 feeds about half that many. Perfect for a small party or a large family dinner for the Holidays. 

The "secret" of this cake is layering! I filled and crumbcoated the entire cake then covered the cake with white fondant. Then I layered on the red top pieces as well as the striped "ribbon" on the sides and then added the rope like trim. Last details were the little gold candy pieces and then the "peppermint" wheels on the top and front of the cake. A lot of rope making goes into a cake like this but I really like the effect in the end. 

Some things I learned from this cake...it's really hard to make curved triangles all look alike and, if I ever need it someday, I now know how to make the top of a circus tent! LOL! So sometimes working on one cake can give you ideas for a few more that you'd like to make in the future.  I also learned how to put the little gold dragees on the cake without using buttercream or royal frosting as glue. What you do is brush water onto the fondant and then roll the little balls into place. What this does is coat the bead lightly with water and helps it to stick to the fondant AND to the other beads! 

Well, I have a busy weekend coming up this week so I'll be posting next Monday instead. I do hope you have a great week and come up with some of your own Holiday Party Cakes to share with your family and friends!

Cat