Sunday, April 7, 2013

Happy Sunday! Today brings Garden Party Cupcakes! With so much Spring in the air (finally IS in the air for those on the East Coast of the US) there are lots of outdoor parties being thrown. Parties for Birthdays, Bridal Showers, Baby Showers and even for our upcoming Mother's Day on May 12th. We figured this was a great time to point out how you can use after holiday sales for something other than the holiday!


 Forgive the cell phone photo here. This was taken at my local Raley's Superstore. I looked at this adorable kit a week before Easter and thought, "Wow, that's SO cute!" Then I looked at the price...OUCH! $12.99! That is when I thought, "hey, the day after Easter these are going on sale for 50% off! I'll come back then and see if they have any of these kits left." Sure enough. I went back on Tuesday and they had a whole bunch of them in the 50% off bin! 

Every holiday has lots of cute things you can use for parties at other times of the year. Valentine's day Heart candy for wedding favors for your Spring wedding. Pumpkins for your Harvest themed wedding.  Beach themed decorations after Memorial or Labor Day Weekends. Even sales on twinkle lights after Christmas. You can take total advantage of these sales and save lots of money.
The other idea behind these cupcakes was to show that you don't have to be a master cake artist to have something pretty to eat on your table. I have a weakness for pretty plates. I have a whole bunch of single plates that I now use as dessert serving plates. None of them match but they are all loved. This one looks like a big pink flower so I though it was perfect for today.
For some reason I seemed to remember that I had paper doilies somewhere in my stuff. Turns out I was wrong. So I took some paper coffee filters, scalloped the edges with my scissors to make them decorative and smaller, and lined the plate with them. Yes, paper doilies would have been easier but this worked in a pinch.
Part of the decoration was also the liners. There were two types of liners with this set, the ones with the green zigzag lines and the ones with flower. Because they didn't have an Easter Chick design on the outside edge, though the green ones did have bunnies on the bottoms, I knew they would work well for our theme.


Sadly, purple doesn't photograph well. The icing on these is actually quite dark and vibrant but I just couldn't get it to photograph that way. Anyway, I used a large open star tip and piped "roses" on the top of each cupcake. For the video tutorial of this just click here for the Rose Tutorial Video.
Finally I used the pretty picks that came in the kit to decorate and finish the cupcakes. Everyone loved them and not one person mentioned Easter!

I'll be putting up a Garden Party Plan tomorrow on the Cherry Party Blog so I hope you take a few minutes to see how easy throwing a Spring Themed party can be!

Also, check us out on Facebook. We are giving tips and tricks for Brides and Grooms for the next two weeks!

See you next week when I bring you a very Disney Themed Party Cake!

Cat

Sunday, March 31, 2013

 Happy Sunday and Happy Easter Sunday to those of us here in the USA! We always have a family dinner for Easter and one of the favorite desserts we have is from our Aunt Kathy. For this blog I'm "re-naming" this dessert "Pistachio Pudding Pie" but in our family it's just known as "The Green Stuff". 
You begin with a dish. I used a decorative yellow pie pan here since it's Easter but usually it's a 9x13 pyrex pan. I'm working with a half recipe here since there are only 5 of us to feed today but normally it's the full recipe for a crowd. You start out with Ritz Crackers. Just the normal ones. 
Melt the butter and put the crackers into a zip lock bag. Now it's time to crush the crackers to make the crust! 
 Roll them out to a fine consistency. You want all of the crumbs to be the same size. After they are all crushed add them to the melted butter. 
 Mix the crumbs and butter well and then press them into your pan. Since I'm using a decorative pan and wanted to show the crust I pressed them all the way up the sides but you can just make a layer in the bottom of the pan. Now bake that for 10 minutes at 350 degrees.

While your crust is baking mix the Jell-O Pistachio pudding with the milk. You can use a hand mixer or, like I did, use a whisk until it's completely combined and has begun to thicken up.
Now mix in the ice cream. This would have been easier for me if I'd let the ice cream soften up a bit but I really wanted to show you all how this looks. Incorporate all of the ice cream into the pudding until it's smooth. Now put that into the refrigerator for 25 minutes to allow it to set up. By the time you are putting your pudding mixture into the fridge your crust will be done. Remove it from the oven and let it cool completely.
 While waiting take your Heath Toffee Bars and dice them up. I place the bars onto my mat and start at an angle and work from one end of the bars to the other and then turn the mat around and work the opposite way and angle. 
 When your pudding mix is set up and your crust is cool it's time to put this all together. As I mentioned above, I wanted the crust to show a bit so I didn't spread the pudding mixture until it completely covered the crust. I let a bit peak out. If you are making a full recipe and just making a bottom layer of the crust then spread the pudding mix completely over the crust layer.
Now take the Cool Whip and spread it over the pudding mixture. Once again, I wanted the crust and pudding mixture to show but if you are making layers then make sure to cover the pudding mixture layer with Cool Whip.
 Now sprinkle your chopped up Heath Bars all over the entire dish. Try to refrain from eating the candy bar before it gets to it's final decorative spot on your dish...ok, ok, so eat a corner, no one will know!
Since this is for our Easter Dinner I wanted to decorate it up a little bit more. So I took a big scoop of Cool Whip and made a little "nest" for the center of the dessert and tucked in some spreckled chocolate "eggs". 

Now, to let you know how good this is. Family members who are reading this right now are finding their mouths are uncontrollably watering. My own family members here in the house have been chanting "Mom made the Green Stuff" and "Oh yeah! We have the GREEN STUFF for dessert!!!" all day long. 

So when you make this for your own family just whisper a little "Thank you Aunt Kathy" for me, ok? It will become a family favorite in an instant!

Here is the full, and half, recipe for you all!


“The Green Stuff”
Ingredients
2 rolls Ritz Crackers
2 sticks of margarine
2 boxes of Pistachio Pudding
1 ½ cups milk
1.5 quart of vanilla ice cream
1 tub Cool Whip
3-4 Heath Bars

Half recipe:
1 roll ritz crackers
1 stick margarine
1 box pistachio pudding
¾ cup milk
3 cups vanilla ice cream
½ tub cool whip
2 heath bars

Start by crushing Ritz crackers. (I use a large Ziploc baggie and roll over with rolling pin) Then melt 2 sticks of margarine and mix Ritz crackers into it. Bake 10 minutes at 350°. Then set out to cool.

Mix 2 Boxes Pistachio pudding with 1½ cups milk. Blend with hand mixer. Then mix in vanilla ice cream. Let sit in refrigerator for 25 minutes to set.

Then spread pudding/ice cream mix over cracker crust. Spread out cool whip on top. Refrigerate until ready to serve. Shave 3-4 Heath Bars and sprinkle over Cool Whip.

Serve and Enjoy!


Hope you guys enjoy our family secret recipe and had a great Easter! Let me know if you give this recipe a try and what you thought of it.  See you next week with a new cake!

Cat

Sunday, March 24, 2013

Happy Sunday! Today brings Michele and Eric's Swirl Wedding Cake! The entire wedding palette was white and purple. I didn't get to see the whole set up, they were just starting when I brought in the cake, but it looked like they were using white as the base and purple as the accent so this cake will fit right in!

Now here is where popular "fashion" and individual taste came in to play. Michele saw, on Pinterest, a "Rose Cake". The design on a rose cake is like this one I did a couple of years ago:
But Michele doesn't really like roses all that much. She loved the idea of an all over swirl pattern but she wanted purple worked into the cake as well. When she saw my Valentine's Wedding Cake, with the little red hearts randomly placed on the cake, she knew just what she wanted...white swirls with purple swirls here or there. Because of this pattern choice butter cream was the perfect medium. And, since it is Spring and not hot outside, which could melt butter cream, I was able to grant her wish.

Now to make the cake is super easy. It's hard on the hands because of all the piping you need to do but it's not a hard pattern to recreate. Just like with the rose cake, you will be using an Open Star tip. The one you use with the Rose Cake is this one (Wilton 2110):
This tip only has a few points in the star and makes the pattern of an open rose easily. To make the swirls you want more points on the star. I use the Wilton tip #32:
You can see how there are many more "lines" when you pipe than the one you use for the rose. Perfect for the swirl pattern I wanted to achieve.

So I baked the Lemon Chiffon cake as normal and froze it wrapped in Press and Seal wrap. Then the night before I was ready to decorate it I took it out of the freezer, filled it with butter cream and crumb coated it with butter cream and let that settle over night. 

I started out by icing the top of the bottom tier after placing it onto the foil covered cake drum. I didn't want to move it again once the swirls were on the sides of the cake and take a very good chance of marring one of the bottom swirls. When you make the swirls, or roses, you will see gaps in the icing. You can either leave them there or just fill them in with your tip. 

To begin the swirls, or roses, you have to keep your tip pointed straight at the surface. No angles with this pattern. Begin in the center of where you want your swirl and circle outward, being careful not to overlap your lines. You can find a video on I Am Baker that you can watch and get a better idea of how to do this. It's super easy. 

To make the pattern look random you actually have to make it not random at all. Plot out where you want your spots of color before you even start. In this case I started out with a spot of color at the top followed by two of white. Then the next line I started with two of white followed by one of color. Then one full row of white before making one with the color in the center followed by one full row of white. Just repeat that pattern all the way around the cake. I then filled in the open spaces and piped one row of swirls around the top edge of the cake.

To pipe the top tier I decided to ice the top of the cake and then move it into place on top of the bottom tier before piping the swirls. I followed the same pattern as the one on the bottom tier making sure not to line up the patterns so that the colored swirls would look random. The last thing you need to do is wait until the icing crusts up a bit and then gently press down any points that might be standing up from your piping.

As I mentioned, the only problem with this design is that it is a lot of piping so your hands will need a rest every now and then. I did use a semi-stiff butter cream recipe so that it would hold the pattern and set up quickly. 

I loved this color palette so much I decided to put together a party plan for it. So check out the Cherry Party Blog tomorrow to see how I would dress up the wedding to go with this beautiful cake!

And don't forget to check out our Facebook Fan Site for daily tips and crafts for your Easter weekend all this week!

Cat


Sunday, March 17, 2013

Happy Sunday! This week brought a "Gender Reveal" Party. This is a lovely new form of the baby shower that can either take the place of one or be an extra gathering added to the happy experience of having a baby! 

Basically you invite family and friends to come over, make their guesses on what they think the sex of the baby is and then at the end of the party you cut into it and the filling or cake color reveals the answer! This is even more fun when the parents don't even know yet. What they do is have their ultrasound tech write down the answer and then put it into an envelope and seal it up. The parents then hand that to the caker so they can make the cake or cupcakes. That way, when the cake is sliced, even the parents get to hear the news for the first time!

For this particular party, the Mom-to-be collects hat boxes so I just copied one of hers for the cake. The only difference here is that the scroll work on her hat box is white and she wanted a pink and blue cake. 

This is what I call a "panel" cake. You roll out panels of fondant and adhere them to the cake. The buttercream crumb coat holds it onto the sides of the cake. So I rolled out two 15 inch long by 4 inch wide rectangles for the outside of the box and then rolled out a 10 inch round for the top of the cake. After that it was just rolling out the 3/4 inch white strips and then adding them to the cake. 

Piping is a bit more tricky. When using a light colored fondant and a dark colored icing to pipe the decorations you must always be aware that wherever you pipe is immediately stained. There are no second chances. There are two ways you can do this. Either freehand, which is what I did here, or use imprint tools. If you use the tools just make sure you don't press too hard onto the side. This is cake, it will dent and you can put holes into your fondant. But it is the way to get perfect piping so many use the imprint tools.

The trickiest part of this whole cake was the cording! The problem was that it was either too stretchy and broke, or too dry and broke. It took me a few times of trying to get it right. In hindsight I wish I'd used real ribbon for this effect. I really try not to use non-edibles on my cakes but in this case I wish I'd thought to do so before I started on the cake and was committed to the fondant cording.

Now the truth about cakers. We are never truly happy with our cakes. Once in a blue moon we will make one that we wouldn't change anything about. But usually we wish we had the time to change something, or re-do some part of it. The truth of the matter is that we know the only person that it's bugging is us. The clients are perfectly happy and don't even see the imperfection that is driving us nuts enough that we would re-do it if we could. However, this is what makes us better the more we work. The next time I have to do cording on a cake I'll know to either be ready for a patience wearing stretch of time or to buy non-edible cording or ribbon for it. For cakers it's a constant life of "live and learn".  And with each and every cake we learn. 

P. S. ....it's a Girl! See the whole party plan tomorrow on our Cherry Party Blog!

Cat

Sunday, March 10, 2013


Happy Sunday! Today brings a Princess Party! Of course there had to be Pretty Princess Cupcakes to match! 

I have made Princess cupcakes many times so it is a challenge each time to come up with something new. The Party Plan was all dark and light pink and white tulle so I decided to do the same with the cupcakes! Making pink icing is really easy so don't let it worry you when you go to do it. But here is a tip...use very little color and build up to the color you want. Just a little gel color on a toothpic can make a good medium pink color so if you are trying to come up with a baby pink be very careful with how much color you use. There is actually a "Barbie Pink" gel color out there to make this vibrant pink that I used for today's cupcakes. Fortunately, because you don't have to use much dye, you don't end up with the chemical taste of the dye. 

A word about cupcake recipes. I get asked all the time what recipes I use for my cakes and cupcakes. Honestly I use a lot of Martha Stewart's recipes which are available right online. However this doesn't mean you have to make your cakes or cupcakes from scratch. There are so many brands of cake mix out there on the shelf for a reason...they are used! However, if you want your cake mix to taste more homemade here are a few tips. First of all, use one more egg than it says on the box for a cake. This makes the cake a bit more dense and rich tasting. Next, use just a tad more oil than is called for normally. Most cake mixes ask for 1/3 cup oil, I use 1/2 cup. I also use 1tsp vanilla, good Mexican vanilla, to add more flavor to the cake or cupcakes. Lastly, for cupcakes you can make them more "tender" by using milk instead of water. Now, most of these tips adds both fat and calories. But, then, we don't eat cake every day, right?

I always recommend some basic piping tips and while I use actual piping bags from Wilton, you can just buy a box of the disposable bags, a few tips which include a small round, a large round, like I used today, as well as a 1M tip. With these three you can make many different designs for your cupcakes. For under $10 you could buy bags, several tips and a package of couplers and have all you need to decorate simple cupcakes or cakes. I was, personally, overjoyed when I got a new Master Tip Set this past Christmas. Tips get crushed in garbage disposals, dropped into the trash, forgotten in the sink or in soaking water and you have to throw them away. So getting new tip sets from time to time is not only wonderful, it's needed. It came in handy today when I needed two large round tips for piping the two colors on the cupcakes!

White candy pearls are a staple in my cake supplies. I use them to decorate cupcakes or trim cakes or just add a bit of bling here or there on a "quilted" cake design. What is really fun is that, in the past couple of years, Wilton has come out with several different colors of these little candies for you to use for decoration! But here is a tip. To put them on one by one can be time consuming and frustrating...if you don't have the tweezers made for this purpose. The tweezers have a sort of hook on the end so you can grab the candy and easily place it on the side of the cake or cupcake you are decorating. The last thing I did was sprinkle on some large grain sugar for a bit more "bling"!

When piping rounds like these make sure you are holding your piping bag upright and not tilted to the side. You will get a completely different look with each angle you take. You would think with round tips that wouldn't be the case but when you get your tips experiment with the angles. You will be happily surprised with the effects you can make just by changing the angle or direction with your tip.

Check out the full Princess Party Plan tomorrow on our Cherry Party Blog. And join us all week long as we make our way to St. Patrick's Day with new tips and crafts for that fun holiday on our Facebook Fan Site !

See you tomorrow!

Cat

Sunday, March 3, 2013

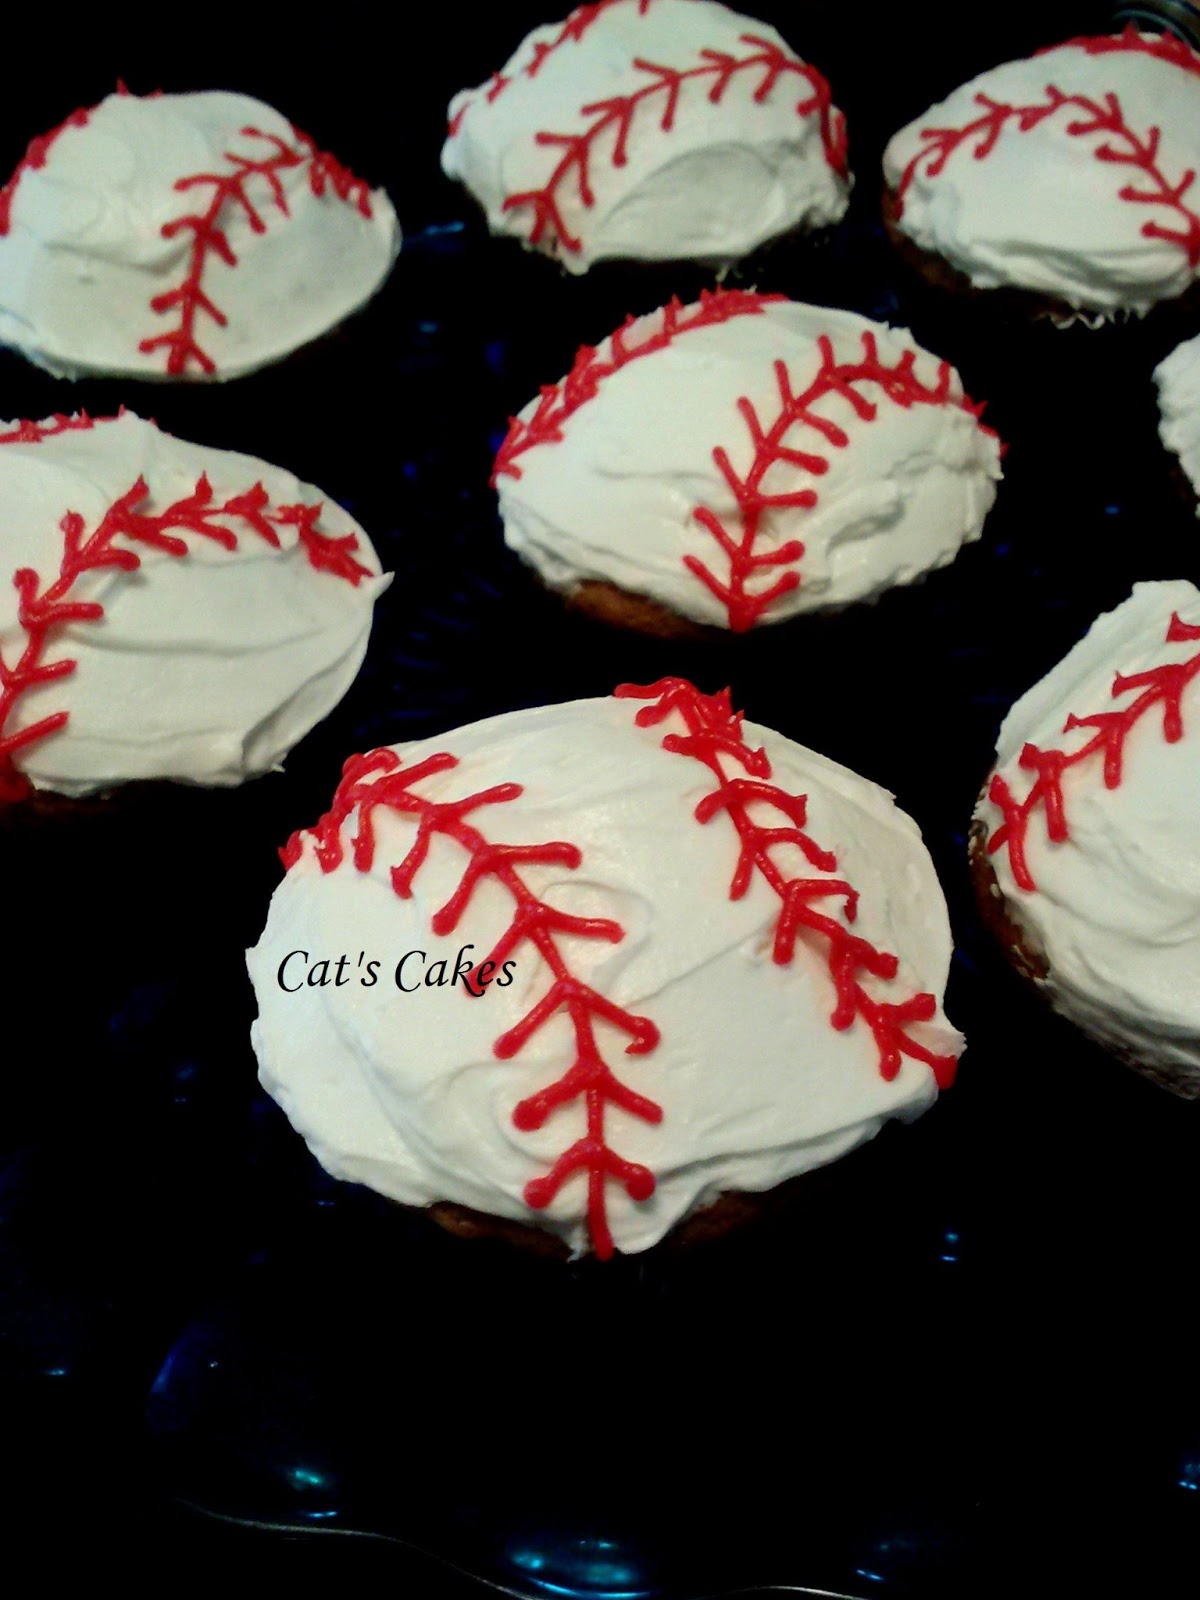
Happy Sunday! This week brought a 4 year olds Baseball themed Birthday Party! Matt loves baseball, everything about it so his mom wanted to throw him a party with all the trimmings including these baseball themed cupcakes.

A quick word about cupcakes. These are perfect for the younger child's party since kids still have an issue with using utensils and they are usually sitting on the ground or walking around with the cake making eating it even more of a challenge. Yes, there is always the mess of frosting on the hands but that's the same even if they use a fork at the age of 4! LOL!

Matt is a vanilla cake sort of kid and so that is what these cupcakes were for his party. Now I'm not a vanilla cake with vanilla icing sort of person but I sure know lots who say this is their favorite combination! In fact my own son, Jack, who is 11, would pick this as well. And, yes, I always ask the preference of the birthday kid to make sure I'm getting the flavors right. In this particular situation I made all of the cupcakes the same flavor but in large orders like this one I could have made them 3 or 4 different flavors. 

Once the cupcakes were totally cool I "flat frosted" them. This just means I used an offset spatula to smooth on the icing. I then used a round cookie cutter the same size as the cupcake top to make light line impressions on the top of the icing. I just moved in from one side and pressed lightly and then moved in from the other side and pressed lightly. 

I have made these cupcakes before without the red center line, trying to make them look more like a real baseball and they didn't get the same response as when I use the red center line. I have no idea why but have learned that if that's what the crowd wants then that is what the crowd gets! 

Red icing is really really hard to get right. And usually you have to use SO much red gel coloring that it ends up being a rather expensive thing to do as well. This is one of those occasions where I buy the red tube of icing instead. One tube will easily do this pattern on 48 cupcakes with some left over. I just squirted the tube icing into a piping bag in order to use the tip I wanted. Then I piped the center line and followed that line with little V's. I have found that, for me, piping right side up V's down one side and then turning the cupcake around and piping more V's seems to work for me. However you choose to do it, just take your time. By the 12th cupcake you will have it down and will be able to go much faster but up till that point take your time or your V's will start to look uneven and messy. And you can not lift off red. It stains the white so wherever you place it, it stains.

And speaking of stains...while this little bit of red won't stain your mouth...any time you use a dark or vibrant color you will be guaranteeing your guests a weirdly colored mouth after eating their cupcakes. Now, kids LOVE this effect but the parents are less than thrilled to end up with purple teeth and lips so make sure to have some uncolored frosted cupcakes for those adults who don't want the "fun" of the dyed ones.

So, in answer to the inevitable question of "does this take a lot of time to do", yes, it does. But it's not terribly hard, it just takes time and patience. In the end the kids were thrilled. One said it was like he had his own baseball on his plate! Ok, high praise from a 4 year old! LOL! 

I didn't get to see the whole party set up when I delivered the cupcakes but she certainly had enough fun looking party supplies to get the look right. Happy Birthday Matt! 

I decided to make up a Party Plan over at the Cherry Party Blog to match the cupcakes so look for that party tomorrow when I post that blog! Lot's of fun for anyone in your family who loves the game!

And we have one more week of fun St. Patrick's Day tips over on our Facebook Fan Site so we hope you drop on by there and take a look as well!

Cat

Monday, February 25, 2013

Happy Monday! Last night was a big deal in our house. It was Oscar Night! For the past 14 years we have been making a big deal out of the Academy Awards broadcast and last night was no different. Each year I make a different cake, sometimes movie themed, sometimes not. I dubbed last night's cake the "Silver Linings" lemon cake but in our house it's normally referred to as "Aunt Patty's Lemon Sunshine Cake" since my sister Patty is the one who found this recipe (which I will post at the end of the blog) and presented it to a very grateful family! 

 You begin with a white or yellow cake mix. Yup, plain ol' boxed mix. Naturally you can make it from scratch but, with an Oscar Party, you want quick and easy so why not use a mix?

Bake it up till it's golden brown. Don't worry about leveling it or even removing it from the pan. I leveled mine so you could see the details easier but you really don't have to do so. Just let it cool off a bit so you don't manage to burn your hands when it comes time to poke it. Yup, I said "poke" it.

Before you poke it mix up a box of lemon Jell-O with 1/2 cup boiling water. Dissolve the powder into the water then add 1/2 cup cold water. You notice that the liquid is drastically cut down from how you would normally make up Jell-O. This is so you don't drown the cake. 

Now take a fork or a skewer and poke holes all over your cake. Try not to get too many in one area but cover the entire cake with holes.

It's time to pour the Jell-O over so that you cover the entire cake. Now put the cake into the fridge for 3 hours to set up. I lightly wrapped mine in Press & Seal to help keep my fridge clean and the fridge smells out of the cake.

When it's all set up remove it from the fridge and place your pan into a bigger pan of warm water and run a spatula around the edges to loosen the cake from the pan.

Tip it out and turn it upright on your cake stand or plate. Now if you bake your cake in a decorative or clear glass dish then you won't have to remove the cake from the dish. Just cover with the "icing" and serve.

Now to make the icing. Mix one package of Jell-O instant lemon pudding mix with one cup cold milk. Stir until it begins to thicken up. Now stir in 1 Tablespoon lemon juice. Now fold in one tub of Cool-Whip. 

Cover your entire cake with the "icing", make pretty swirls or dips or whatever. Top with grated lemon zest for an added touch.

In the past we have made this recipe in a 9x13 pan and, I have to say, it is much easier to cover the cake with the icing than the 6 inch round cake I chose this year. If you decide to do an "out of pan" cake then, after you unmold it, place it onto a cooling rack and pour the icing over it like you would ganache. It will drip all down the sides and through the wire rack so put something under the rack like a cookie sheet to catch the drippings. The icing sets up fairly quickly so you will be able to transfer it to a cake plate in just a few minutes after covering it.

I promise you. This cake is SO good you will be glad you are sharing it with others so you don't eat it all up by yourself.

Here is the complete recipe:


    Cake:
    1 3 oz. package lemon gelatin
    1/2 C. boiling water
    1/2 C. cold water 

    1 package instant lemon pudding and pie filling
    1 C. cold milk
    1 T. lemon juice
    2 C. whipped topping thawed

Recipe
    Preheat oven to 350° F. Lightly spray a 9 x 13, 8 inch square or round pan. For cake, prepare according to package directions. Let cool for 30 minutes. Poke holes in cake 1 1/2 inches deep and 1/2 inch wide. Dissolve gelatin in boiling water, stir in cold water. Slowly pour gelatin over cake. Refrigerate at least 3 hours. 

    For topping, combine pudding mix, milk and lemon juice in a bowl. Whisk until it begins to thicken. Gently fold in whipped topping. Spread evenly over cake. Sprinkle with lemon zest. 
    SERVES 8 - 10
You are really going to LOVE this cake! Enjoy!

Check out the Cherry Party Blog today to see our entire Oscar Party including more food recipes! As always you can join us over at our Facebook Fan Site for daily tips and tricks. We are presenting some fun ideas for St. Patrick's Day starting today!

Cat